Prefer an ad-free version to print? Find it HERE on Ravelry
So, I wasn’t going to continue anymore patterns for the Ana Series. I mean, I already have 5 patterns in the series aren’t you all sick of it yet?? But this idea was wayyy too cute not to share!!!
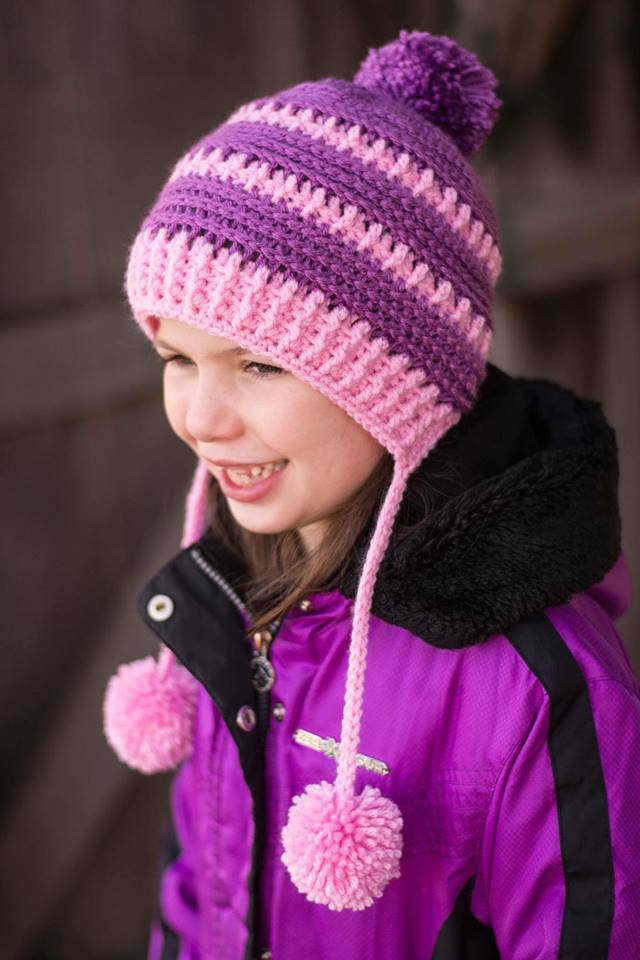
Now we have the Ana Bonnet. Which has all of the beautiful textured stitches like the Ana Beanie, which has been a huge favorite of everyone!! It gets the most pattern views on crochetitcreations.com and the most sales on my Ravelry Store and Etsy Shop.
The BEST thing about the Ana Bonnet (besides the fact that it’s a cute bonnet, obviously) is that it comes in Baby to Adult sizes! I’ve had several requests fro the Ana Beanie in baby sizes, since it only comes in adult and child. So, here is the Ana Bonnet in not 1, not 2, but 6 sizes!!! Perfect to keep the whole family warm this winter!
Unlike the Ana Beanie, it is worked from the top down. But it does use some of the same beautiful stitches, like the camel stitch and post stitches. It is completed with super cute strings with pom poms and a larger pom pom on top. My testers really, really loved this pattern and I hope you do too!
If you are looking for more patterns in the Ana Series like I mentioned above, check out the Ana Beanie, Messy Bun Beanie, Infinity Scarf, Ear Warmer, and Fingerless Gloves! There is also a tutorial video on out YouTube Channel for the Ana Beanie.

Materials Needed
- I 5.5mm & G 4.0mm Crochet Hooks
- 100-300 yards Medium #4 Yarn
- Scissors
- Tapestry Needle
- Optional: Small & Large Clover Pom Pom Maker
Gauge
- 3.5 HDC x 2.5 Rows = 1” in I hook
Stitches Used (US Terms)
- HDC – Half Double Crochet
- BPHDC – Back Post Half Double Crochet
- FPHDC – Front Post Half Double Crochet
- SC – Single Crochet
- Camel stitch – crochet in the third loop, located behind the usual loops worked in
- Join – Slip Stitch to first st (over the ch)
Pattern Notes
- Beginning chain DOES NOT count as a stitch
- To get a clean seam on the camel stitches, remove your hook after joining. Insert hook into the back of the stitch just joined to, grab the loop and pull it to the back of the stitch. Chain and begin your camel stitch.
- Bonnet is worked from the top down
Ana Bonnet Crochet Pattern by Crochet it Creations
6 Months Size
Measures 14″W x 6.5″L
Using I5.5mm Hook
Rnd 1: ch 1, 10 HDC in magic ring. Pull ring tight. (10) do not join – continue working in a spiral, use stitch markers to mark last st.
Rnd 2: 2HDC in each st (20) move stitch marker at the end of each rnd
Rnd 3: *HDC in 1 st, 2HDC in next* repeat around (30)
Rnd 4: *HDC in 2 st, 2HDC in next* repeat around (40)
Rnd 5: *HDC in 3 st, 2HDC in next* repeat around (50) remove stitch marker & join
Rnd 6 – 8: ch 1, HDC camel stitch in each stitch around. Join (50)
Rnd 9: ch 1, *FPHDC in 1 st, BPHDC in next* repeat around. Join (50)
Rnd 10 – 13: repeat rounds 6 – 9
Rnd 14 – 15: ch 1, HDC camel stitch around. Join (50)
Switch to G4mm Hook
Rnd 16: ch 1, HDC camel stitch in 39 stitches. Do Not Join, leave remaining stitches unworked (39) Turn
Rnd 17: ch 1, HDC in 1st stitch. *BPHDC in next st, FPHDC in next st* repeat across. HDC in last stitch. (39) Turn
Rnd 18: ch 1, HDC in 1st stitch. *FPHDC in next st, BPHDC in next st* repeat across. HDC in last stitch. (39) turn Do not finish off, continue to border and hanging strings.
Rnd 19: Ch 1, SC down the side of the post rows, SC camel stitch in the 11 st across the back of beanie, SC up the other side of post rows. Make 1st string – ch 20, sl st in 2nd ch from hk and each ch. SC across front of beanie. Make 2nd string – Ch 20, sl st in 2nd ch from hk and each ch. Join to 1st sc. Finish off. Make and add 2 small pom poms for the strings and 1 larger pom pom for the top.
1 Year Size
Measures 15.5″W x 7″L
Using I5.5mm Hook
Rnd 1: ch 1, 10 HDC in magic ring. Pull ring tight. (10) do not join – continue working in a spiral, use stitch markers to mark last st.
Rnd 2: 2HDC in each st (20) move stitch marker at the end of each rnd
Rnd 3: *HDC in 1 st, 2HDC in next* repeat around (30)
Rnd 4: *HDC in 2 st, 2HDC in next* repeat around (40)
Rnd 5: *HDC in 3 st, 2HDC in next* repeat around (50) remove stitch marker & join
Rnd 6: *HDC camel stitch in 9 st, 2HDC camel stitch in next* repeat around (55)
Rnd 7 – 8: ch 1, HDC camel stitch around. Join (55)
Rnd 9: ch 1, *FPHDC in 1 st, BPHDC in next* repeat around. will end with FPHDC. Join (55)
Rnd 10: ch 1, HDC in each stitch around (through normal top loops). Join (55)
Rnd 11: ch 1, HDC camel stitch around. Join. (55)
Rnd 12 – 16: repeat rounds 7 – 11
Rnd 17: ch 1, HDC camel stitch around. Join (55)
Switch to G4mm Hook
Rnd 18: ch 1, HDC camel stitch in 43 stitches. Do Not Join, leave remaining stitches unworked (43) Turn
Rnd 19: ch 1, HDC in 1st stitch. *BPHDC in next st, FPHDC in next st* repeat across. HDC in last stitch. (43) Turn
Rnd 20: ch 1, HDC in 1st stitch. *FPHDC in next st, BPHDC in next st* repeat across. HDC in last stitch. (43) turn Do not finish off, continue to border and hanging strings.
Rnd 21: Ch 1, SC down the side of the post rows, SC camel stitch in the 12 st across the back of beanie, SC up the other side of post rows. Make 1st string – ch 22, sl st in 2nd ch from hk and each ch. SC across front of beanie. Make 2nd string – Ch 22, sl st in 2nd ch from hk and each ch. Join to 1st sc. Finish off. Make and add 2 small pom poms for the strings and 1 larger pom pom for the top.
2 Years Size
Measures 17″W x 7.5″L
Using I5.5mm Hook
Rnd 1: ch 1, 10 HDC in magic ring. Pull ring tight. (10) do not join – continue working in a spiral, use stitch markers to mark last st.
Rnd 2: 2HDC in each st (20) move stitch marker at the end of each rnd
Rnd 3: *HDC in 1 st, 2HDC in next* repeat around (30)
Rnd 4: *HDC in 2 st, 2HDC in next* repeat around (40)
Rnd 5: *HDC in 3 st, 2HDC in next* repeat around (50)
Rnd 6: *HDC in 4 st, 2HDC in next* repeat around (60) remove stitch marker & join
Rnd 7 – 9: ch 1, HDC camel stitch around. Join (60)
Rnd 10: ch 1, *FPHDC in 1 st, BPHDC in next* repeat around. Join (60)
Rnd 11: ch 1, HDC in each stitch around (through normal top loops). Join (60)
Rnd 12 – 16: repeat rounds 7 – 11
Rnd 17 – 18: ch 1, HDC camel stitch around. Join (60)
Switch to G4mm Hook
Rnd 19: ch 1, HDC camel stitch in 47 stitches. Do Not Join, leave remaining stitches unworked (47) Turn
Rnd 20: ch 1, HDC in 1st stitch. *BPHDC in next st, FPHDC in next st* repeat across. HDC in last stitch. (47) Turn
Rnd 21: ch 1, HDC in 1st stitch. *FPHDC in next st, BPHDC in next st* repeat across. HDC in last stitch. (47) turn
Rnd 22: repeat round 20 Do not finish off, continue to border and hanging strings.
Rnd 23: start with strings – ch 24, sl st in 2nd ch from hk and each ch. SC across front of beanie. Ch 24, sl st in 2nd ch from hk and each ch. SC down the side of the post rows, SC camel stitch in the 13 stitch across the back of the beanie, SC up the other side of post rows. Join, finish off. Make and add 2 small pom poms for the strings and 1 larger pom pom for the top.
3-5 Years Size
Measures 18.5″W x 7.5″L
Using I5.5mm Hook
Rnd 1: ch 1, 10 HDC in magic ring. Pull ring tight. (10) do not join – continue working in a spiral, use stitch markers to mark last st.
Rnd 2: 2HDC in each st (20) move stitch marker at the end of each rnd
Rnd 3: *HDC in 1 st, 2HDC in next* repeat around (30)
Rnd 4: *HDC in 2 st, 2HDC in next* repeat around (40)
Rnd 5: *HDC in 3 st, 2HDC in next* repeat around (50)
Rnd 6: *HDC in 4 st, 2HDC in next* repeat around (60) remove stitch marker & join
Rnd 7: *HDC camel stitch in 11 st, 2HDC camel stitch in next* repeat around. Join (65)
Rnd 8 – 9: ch 1, HDC camel stitch around. Join (65)
Rnd 10: ch 1, *FPHDC in 1 st, BPHDC in next* repeat around. will end with FPHDC. Join (65)
Rnd 11: ch 1, HDC in each stitch around (through normal top loops). Join (65)
Rnd 12: ch 1, HDC camel stitch around. Join. (65)
Rnd 13 – 17: repeat rounds 8 – 12
Rnd 18: ch 1, HDC camel stitch around. Join (65)
Switch to G4mm Hook
Rnd 19: ch 1, HDC camel stitch in 51 stitches. Do Not Join, leave remaining stitches unworked (51) Turn
Rnd 20: ch 1, HDC in 1st stitch. *BPHDC in next st, FPHDC in next st* repeat across. HDC in last stitch. (51) Turn
Rnd 21: ch 1, HDC in 1st stitch. *FPHDC in next st, BPHDC in next st* repeat across. HDC in last stitch. (51) turn
Rnd 22: repeat round 20 Do not finish off, continue to border and hanging strings.
Rnd 23: start with strings – ch 26, sl st in 2nd ch from hk and each ch. SC across front of beanie. Ch 26, sl st in 2nd ch from hk and each ch. SC down the side of the post rows, SC camel stitch in the 14 stitch across the back of the beanie, SC up the other side of post rows. Join, finish off. Make and add 2 small pom poms for the strings and 1 larger pom pom for the top.
6-10 Years Size
Measures 20″W x 8″L
Using I5.5mm Hook
Rnd 1: ch 1, 10 HDC in magic ring. Pull ring tight. (10) do not join – continue working in a spiral, use stitch markers to mark last st.
Rnd 2: 2HDC in each st (20) move stitch marker at the end of each rnd
Rnd 3: *HDC in 1 st, 2HDC in next* repeat around (30)
Rnd 4: *HDC in 2 st, 2HDC in next* repeat around (40)
Rnd 5: *HDC in 3 st, 2HDC in next* repeat around (50)
Rnd 6: *HDC in 4 st, 2HDC in next* repeat around (60)
Rnd 7: *HDC in 5 st, 2HDC in next* repeat around (70) remove stitch marker & join
Rnd 8 – 10: ch 1, HDC camel stitch around. Join (70)
Rnd 11: ch 1, *FPHDC in 1 st, BPHDC in next* repeat around. Join (70)
Rnd 12: ch 1, HDC in each stitch around (through normal top loops). Join (70)
Rnd 13 – 17: repeat rounds 8 – 12
Rnd 18 – 19: ch 1, HDC camel stitch around. Join (70)
Switch to G4mm Hook
Rnd 20: ch 1, HDC camel stitch in 55 stitches. Do Not Join, leave remaining stitches unworked. (55) Turn
Rnd 21: ch 1, HDC in 1st stitch. *BPHDC in next st, FPHDC in next st* repeat across. HDC in last stitch. (55) Turn
Rnd 22: ch 1, HDC in 1st stitch. *FPHDC in next st, BPHDC in next st* repeat across. HDC in last stitch. (55) turn
Rnd 23 – 24: repeat round 21 & 22. Do not finish off, continue to border and hanging strings.
Rnd 25: Ch 1, SC down the side of the post rows, SC camel stitch in the 15 st across the back of beanie, SC up the other side of post rows. Make 1st string – ch 28, sl st in 2nd ch from hk and each ch. SC across front of beanie. Make 2nd string – Ch 28, sl st in 2nd ch from hk and each ch. Join to 1st sc. Finish off. Make and add 2 small pom poms for the strings and 1 larger pom pom for the top.
Adult Size
Measures 21.5″W x 8.5″L
Using I5.5mm Hook
Rnd 1: ch 1, 10 HDC in magic ring. Pull ring tight. (10) do not join – continue working in a spiral, use stitch markers to mark last st.
Rnd 2: 2HDC in each st (20) move stitch marker at the end of each rnd
Rnd 3: *HDC in 1 st, 2HDC in next* repeat around (30)
Rnd 4: *HDC in 2 st, 2HDC in next* repeat around (40)
Rnd 5: *HDC in 3 st, 2HDC in next* repeat around (50)
Rnd 6: *HDC in 4 st, 2HDC in next* repeat around (60)
Rnd 7: *HDC in 5 st, 2HDC in next* repeat around (70) remove stitch marker & join
Rnd 8: *HDC in 13 st, 2HDC in next* repeat around. (75)
Rnd 9 – 11: ch 1, HDC camel stitch around. Join (75)
Rnd 12: ch 1, *FPHDC in 1 st, BPHDC in next* repeat around. Will end with FPHDC. Join (75)
Rnd 13: ch 1, HDC in each stitch around (through normal top loops). Join (75)
Rnd 14 – 18: repeat rounds 9 – 13
Rnd 19 – 21: ch 1, HDC camel stitch around. Join (75)
Switch to G4mm Hook
Rnd 22: ch 1, HDC camel stitch in 59 stitches. Do Not Join, leave remaining stitches unworked. (58) Turn
Rnd 23: ch 1, HDC in 1st stitch. *BPHDC in next st, FPHDC in next st* repeat across. HDC in last stitch. (59) Turn
Rnd 24: ch 1, HDC in 1st stitch. *FPHDC in next st, BPHDC in next st* repeat across. HDC in last stitch. (59) turn
Rnd 25 – 27: repeat round 23 & 24. Do not finish off, continue to border and hanging strings.
Rnd 28: start with strings – ch 28, sl st in 2nd ch from hk and each ch. SC across front of beanie. Ch 28, sl st in 2nd ch from hk and each ch. SC down the side of the post rows, SC camel stitch in the 16 stitch across the back of the beanie, SC up the other side of post rows. Join, finish off. Make and add 2 small pom poms for the strings and 1 larger pom pom for the top.

Prefer an ad-free version to print? Find it HERE on Ravelry
Save for later or share with others using the share buttons at the top and bottom of post. If you have any questions please comment below or you can email me at jessica@crochetitcreations.com.
I love to see photos of your work and read your comments. Follow Crochet It Creations on all of your favorite social media sites! Join my Crochet It Creations Crochet Friends Facebook group to further connect!
You may sell your items made from my patterns. Please do not use my photos as your own to sell your work. A link back to my site is much appreciated when selling your items from my patterns. I hope you enjoy!
This site is supported by advertisers and may contain affiliate links. See copyright & disclosure policy here for more information.

I just made this for my granddaughter she’s gonna love it. How did you attach the poms to the side pieces?
I leave a long strand of yarn when tiring the center of the Pom. Use those long strands to sew onto the “braids” making sure to go through the center of the Pom many times to secure tight.
I’m on round 16 of the 3 to 5 yr.old pattern, and it’s measuring 22″ around and 6″ in height. I’m using red heart yarn and 5.5 hook. Is the hat supposed to be this large at this point?
That sounds too big. How was your gauge?
I did not do a gauge, but normally I do 54 to 55 sts. for that age. It may just be the way I crochet. It’s a nice pattern.
On rows 25-27 it says “repeat rows 21 & 22”, but row 21 is the last round of joining, so this doesn’t make sense to me. Can you please clarify rows 25-27? Thank you!
Forgot to clarify, I am making the adult size.
That is a typo! It’s repeat rows 23&24
Thank you about rows 25-27, it didn’t make sense to me either – glad I checked out the comments, too!
I struggled with this pattern because of the typo in rows 25-27. It would help if you corrected your pattern. I stitched it as written but didn’t like it. I took it out and was doing double crochet until I read through the comments and found the answer to the typos. Please fix it. Also would be helpful to tell how and when you did color changes. I liked the pattern because of the two colors. I was able to figure out the color changes but should be noted in the pattern. Sorry to be negative but I really liked the photo and am making this for my great niece. I want others to enjoy this cute pattern as well.
It is corrected, thanks for pointing it out. On the purple and pink bonnet, the post stitches rows were completed in pink and the rest in purple.
I crocheted the 2 year size in lavender and cream. Was very pleased with the pattern. It was easy to follow, easy to crochet and I loved the way the seam fell to the side to camouflage it. I will crochet again and try your other patterns. Thank you.