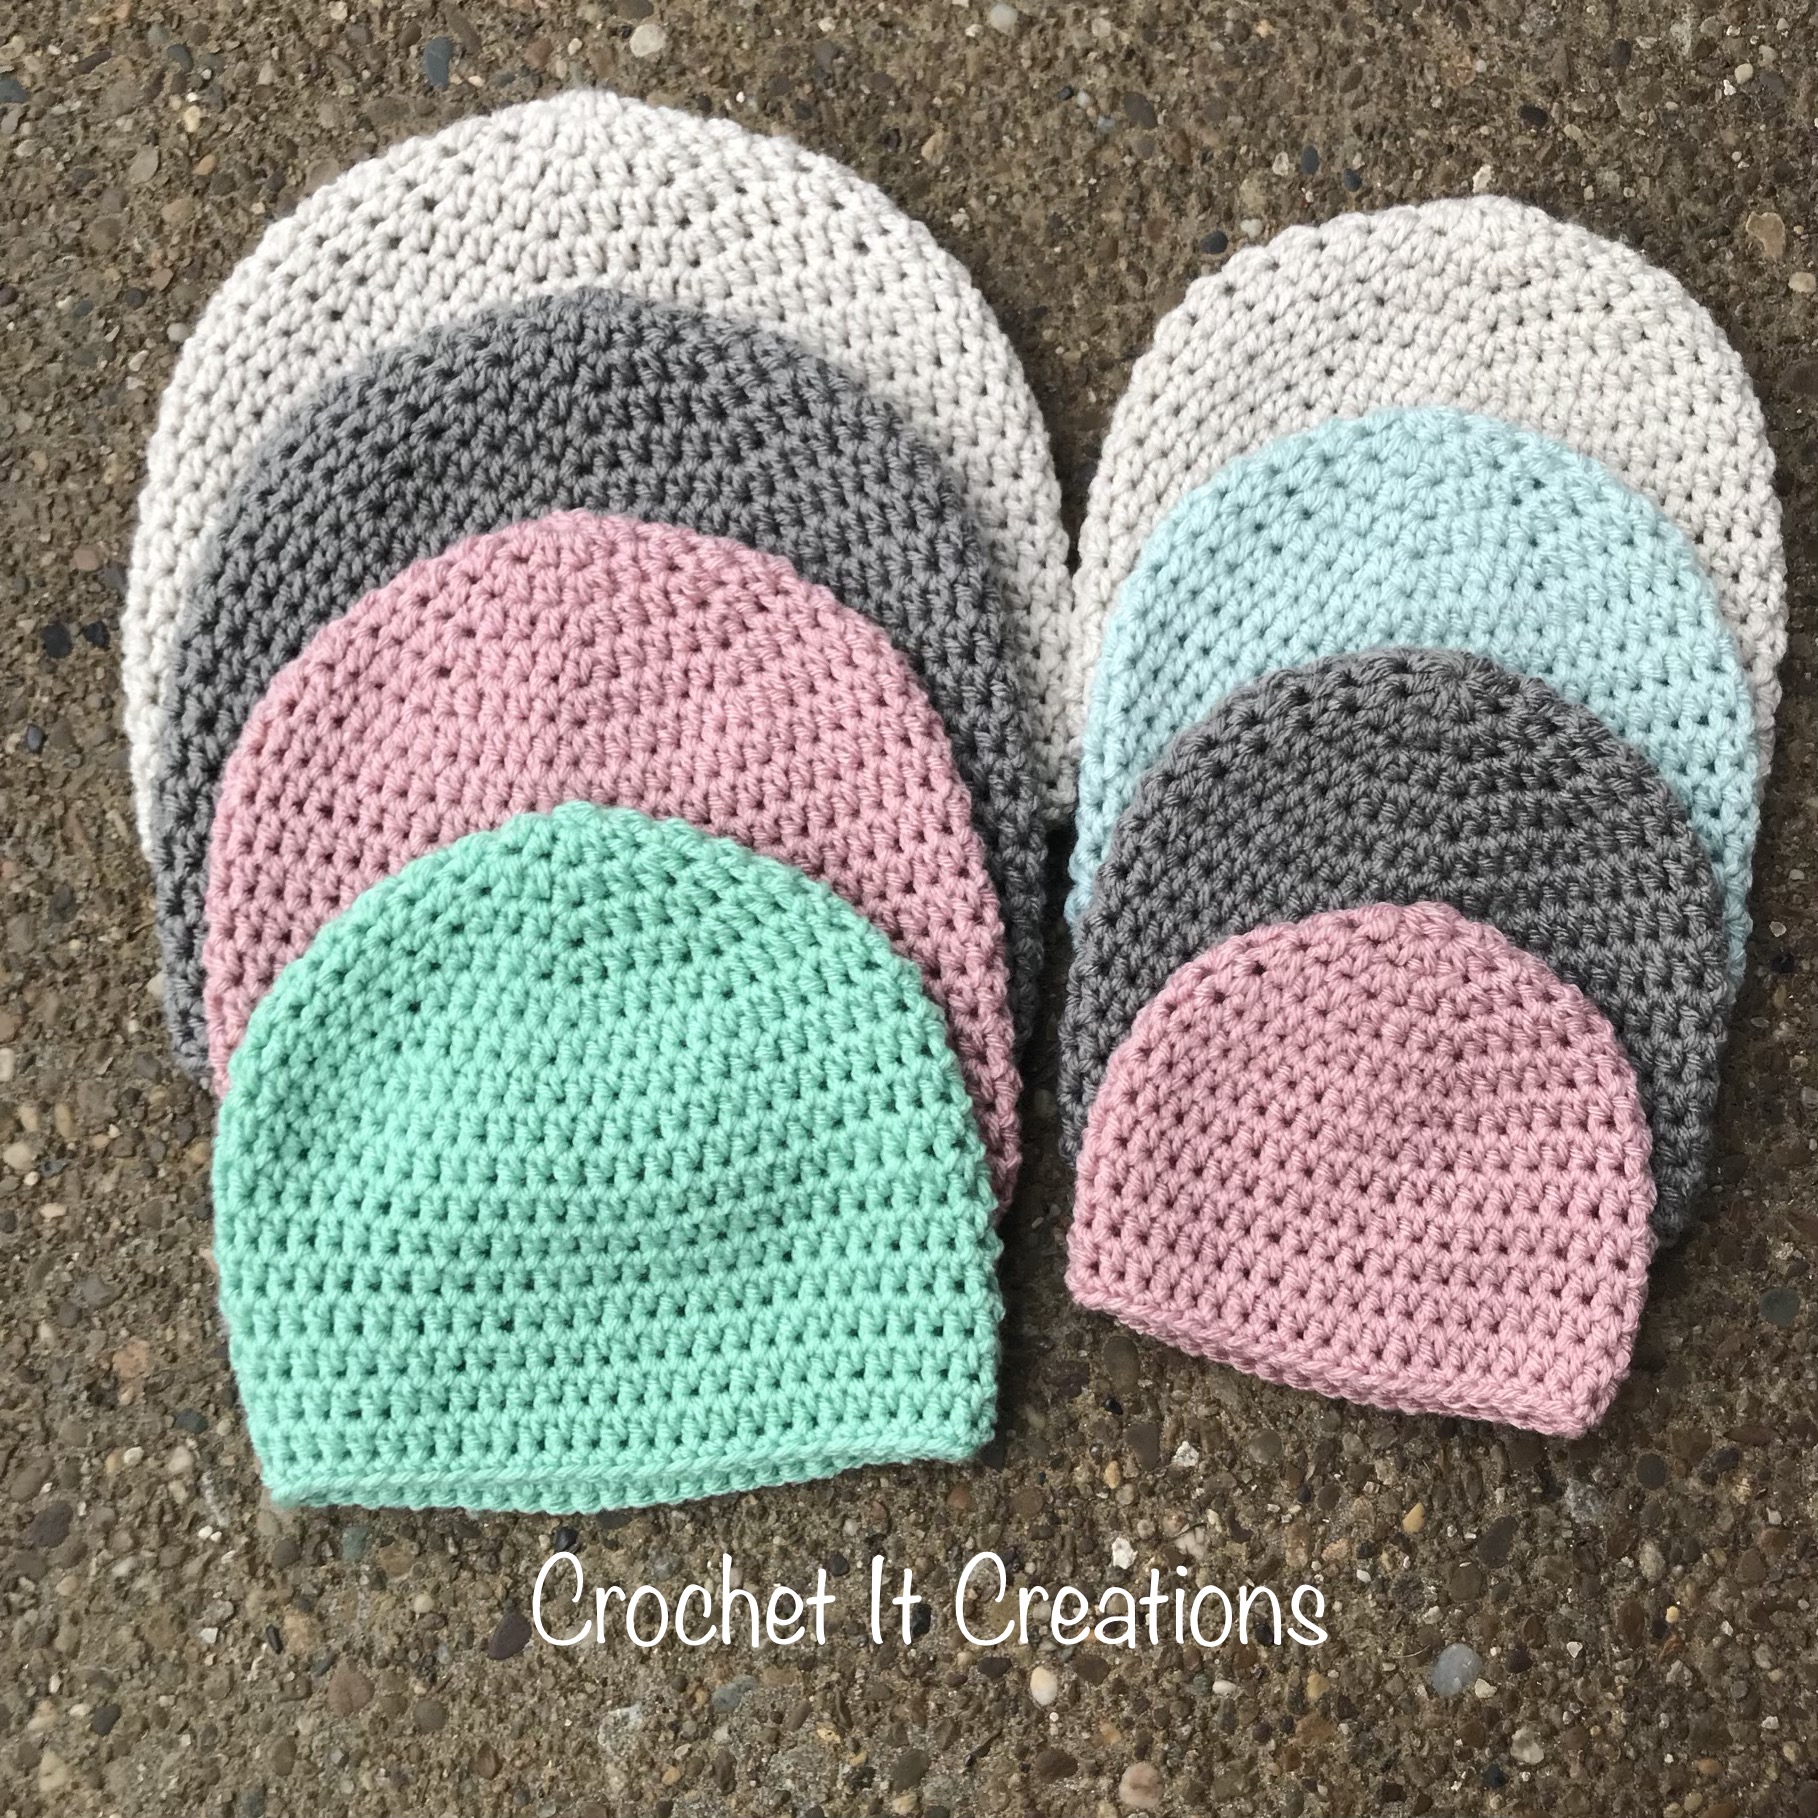
This Basic Hat Crochet Pattern is as basic of crocheting as you can get! Use the Half Double Crochet Stitch to make in any size from newborn to adult.
You can leave the beanie plain, or add to it. Pattern has variations to add ear flaps. From there you can add cute braids. Or you can make a few rounds of post stitches to give the beanie texture. It also keeps the brim of the beanie from getting stretched out.
An ad-free PDF version of this pattern to print can be found on Ravelry HERE

A lot of the crochet work I do starts with a basic crochet hat. From there you can add ear flaps, braids, eyes, ears, flower, etc! The possibilities are endless.
Or you can leave them plain. Or add front post back post stitches to the last rows to give a little texture. I love this method because it keeps the hat from stretching out.

Below are the dimensions that I go off of when making almost every hat. The width is the total circumference of the hat, so it will be divided in half when measuring.

Basic Hat Crochet Pattern in 8 Sizes
Materials Needed:
- Size H hook or size needed to obtain gauge
- #4 medium weight yarn
- scissors
- yarn needle for sewing in ends
- Measuring tape – you will need to check measurements of the hat to assure fit.
- Stitch markers
Stitches Used
- HDC – Half Double Crochet
- HDC2TOG – HDC 2 Stitches Together
- Join – Slip Stitch to First Stitch
- SC – Single Crochet
- Sl St – Slip Stitch
- St(s) – Stitch(es)
- Ch – Chain
Gauge
- 4″ square – 14 hdc x 9 rows
Pattern Notes
- Pattern is written in U.S. crochet terms
- Work pattern seamlessly in a spiral by not joining on each round. Use stitch markers to keep your place.
- Optional to add some texture to the pattern: alternate BPHDC and FPHDC on last 2-3 rows. This also allows for more form fitting around the head and keeps the hat from stretching out. I like to do this option if I am not adding ear flaps.
- Finish with a Pom Pom on top. See HERE how to make a yarn one and HERE for faux fur.
Not all medium weight yarns feel the same thickness. Sizing will vary based on yarn. My favorite yarn for hats are Red Heart With Love, Hobby Lobby I Love This Yarn, Loops and Threads Impeccable from Michael’s or Big Twist Premium from Joanns. I stay away from the value or super saver yarns on my hats because they tend to be too scratchy.

NEWBORN SIZE
12″W x 5″L
Rnd 1: Ch 1, 8 HDC in magic ring (8) do not join, continue working in a spiral. Use stitch marker to mark the last stitch
Rnd 2: 2HDC in each st (16) move stitch marker each rnd
Rnd 3: *HDC in 1 st, 2HDC in next st* repeat around (24)
Rnd 4: *HDC in 2 sts, 2HDC in next st* repeat around (32)
Rnd 5: *HDC in 3 sts, 2HDC in next st* repeat around (40)
Rnd 6 – 12: HDC around. (40) Join to first st.
Continue with ear flaps. Or end with a row of SC
Rnd 13: Ch 1, SC around, join. (40) Finish off, weave in ends.
Ear Flaps for NB
*Do not finish of on last round of beanie and continue working the first ear flap.
Row 1: Ch 1, HDC in 9 sts, turn. (9)
Row 2: Ch 1, HDC2TOG, HDC in 5 sts, HDC2TOG, turn. (7)
Row 3: Ch 1, HDC2TOG, HDC in 3 sts, HDC2TOG, turn. (5)
Row 4: Ch 1, HDC2TOG, HDC in next st, HDC2tog. (3) Finish off
*skip 6 stitches and sl st in the next st. Repeat rows 1-4 for the second ear flap. Do not finish off on last row of second ear flap. Sc around the entire hat. Sl st to first sc. finish off.
The ear flaps will be toward the back of the hat and not centered, like in this photo. And you can see the row of sc.

Santa Baby Hat pattern can be found here.
3 MONTHS SIZE
Measures 14″W x 6″L
Rnd 1: Ch 1, 8 HDC in magic ring (8) do not join, continue working in a spiral. Use stitch marker to mark the last stitch
Rnd 2: 2HDC in each st (16) move stitch marker each rnd
Rnd 3: *HDC in 1 st, 2HDC in next st* repeat around (24)
Rnd 4: *HDC in 2 sts, 2HDC in next st* repeat around (32)
Rnd 5: *HDC in 3 sts, 2HDC in next st* repeat around (40)
Rnd 6: *HDC in 9 sts, 2HDC in next st* repeat around (44)
Rnd 7- 14: HDC around. (44) Join last rnd.
Continue with ear flaps or end with a row of SC:
Rnd 15: Ch 1, SC around, join. (44) Finish off.
Use the ear flaps for newborn size, leaving 8 sts in the back between them instead of 6.
6 MONTHS SIZE
Measures 15″W x 6.25″L
Rnd 1: Ch 1, 8 HDC in magic ring (8) do not join, continue working in a spiral. Use stitch marker to mark the last stitch
Rnd 2: 2HDC in each st (16) move stitch marker each rnd
Rnd 3: *HDC in 1 st, 2HDC in next st* repeat around (24)
Rnd 4: *HDC in 2 sts, 2HDC in next st* repeat around (32)
Rnd 5: *HDC in 3 sts, 2HDC in next st* repeat around (40)
Rnd 6: *HDC in 4 sts, 2HDC in next st* repeat around (48)
Rnd 7 – 15: HDC around (48) Join on last rnd.
Continue with ear flaps or end with a row of SC:
Rnd 16: Ch 1, SC around, join. (48) Finish off.
Use the ear flaps for newborn size, leave 10 sts in the back between them instead of 6.
12 MONTHS SIZE
Measures 16″W x 6.75″L
Rnd 1: Ch 1, 8 HDC in magic ring (8) do not join, continue working in a spiral. Use stitch marker to mark the last stitch
Rnd 2: 2HDC in each st (16) move stitch marker each rnd
Rnd 3: *HDC in 1 st, 2HDC in next st* repeat around (24)
Rnd 4: *HDC in 2 sts, 2HDC in next st* repeat around (32)
Rnd 5: *HDC in 3 sts, 2HDC in next st* repeat around (40)
Rnd 6: *HDC in 4 sts, 2HDC in next st* repeat around (48)
Rnd 7: *HDC in 23 sts, 2HDC in next st* repeat again (50)
Rnd 8 – 16: HDC around (50) Join on last rnd.
Continue with ear flaps or end with a row of SC:
Rnd 17: Ch 1, SC around, join. (50) Finish off.
Use the ear flaps for newborn size, leaving 10 sts in the back between them instead of 6.
2 YEAR OLD SIZE
Measures 17″W x 7″L
Rnd 1: Ch 1, 8 HDC in magic ring (8) do not join, continue working in a spiral. Use stitch marker to mark the last stitch
Rnd 2: 2HDC in each st (16) move stitch marker each rnd
Rnd 3: *HDC in 1 st, 2HDC in next st* repeat around (24)
Rnd 4: *HDC in 2 sts, 2HDC in next st* repeat around (32)
Rnd 5: *HDC in 3 sts, 2HDC in next st* repeat around (40)
Rnd 6: *HDC in 4 sts, 2HDC in next st* repeat around (48)
Rnd 7: *HDC in 11 sts, 2HDC in next st, [HDC in 5 sts, 2HDC in next st] repeat [ to ] * repeat * to * (54 sts)
Rnd 8 -17: HDC around (54) Join on last rnd.
Continue with ear flaps or end with a row of SC:
Rnd 18: Ch 1, SC around, join. (54) Finish off.
Ear Flaps for 2 YR Size
*Do not finish of on last round of beanie and continue working the first ear flap.
Row 1: Ch 1, HDC in 11 sts, turn. (11)
Row 2: Ch 1, HDC2TOG, HDC 7 sts, HDC2TOG, turn. (9)
Row 3: Ch 1, HDC2TOG, HDC in 5 sts, HDC2TOG, turn. (7)
Row 4: Ch 1, HDC2TOG, HDC in 3 sts, HDC2TOG, turn (5)
Row 5: Ch 1, HDC2TOG, HDC in next st, HDC2TOG. (3) Finish off
*skip 10 sts and sl st in the 10th st. Repeat rows 1-5 for the second ear flap. Do not finish off on last row of second ear flap. SC around the entire hat, join, finish off.
3-5 YEAR OLD SIZE
Measures 18″W x 7.5″L
Rnd 1: Ch 1, 8 HDC in magic ring (8) do not join, continue working in a spiral. Use stitch marker to mark the last stitch
Rnd 2: 2HDC in each st (16) move stitch marker each rnd
Rnd 3: *HDC in 1 st, 2HDC in next st* repeat around (24)
Rnd 4: *HDC in 2 sts, 2HDC in next st* repeat around (32)
Rnd 5: *HDC in 3 sts, 2HDC in next st* repeat around (40)
Rnd 6: *HDC in 4 sts, 2HDC in next st* repeat around (48)
Rnd 7: *HDC in 5 sts, 2HDC in next st* repeat around (56)
Rnd 8 – 19: HDC around (56) Join on last rnd
Continue with ear flaps or end with a row of SC:
Rnd 20: Ch 1, SC around, join. (56) Finish off.
Use the ear flaps from the 2 years size.
6-10 YEAR OLD SIZE
Measures 19″W x 8″L
Rnd 1: Ch 1, 8 HDC in magic ring (8) do not join, continue working in a spiral. Use stitch marker to mark the last stitch
Rnd 2: 2HDC in each st (16) move stitch marker each rnd
Rnd 3: *HDC in 1 st, 2HDC in next st* repeat around (24)
Rnd 4: *HDC in 2 sts, 2HDC in next st* repeat around (32)
Rnd 5: *HDC in 3 sts, 2HDC in next st* repeat around (40)
Rnd 6: *HDC in 4 sts, 2HDC in next st* repeat around (48)
Rnd 7: *HDC in 5 sts, 2HDC in next st* repeat around (56)
Rnd 8: *HDC in 13 sts, 2HDC in next st* repeat around (60)
Rnd 9 – 20: HDC around (60) Join on last rnd.
Continue with ear flaps or end with a row of SC:
Rnd 21: Ch 1, SC around, join. (60) Finish off.
Use the same ear flaps as the 2 years size. leaving 14 sts in the back instead of 10.
ADULT SIZE
Measures 20″W x 8.5″L
Rnd 1: Ch 1, 8 HDC in magic ring (8) do not join, continue working in a spiral. Use stitch marker to mark the last stitch
Rnd 2: 2HDC in each st (16) move stitch marker each rnd
Rnd 3: *HDC in 1 st, 2HDC in next st* repeat around (24)
Rnd 4: *HDC in 2 sts, 2HDC in next st* repeat around (32)
Rnd 5: *HDC in 3 sts, 2HDC in next st* repeat around (40)
Rnd 6: *HDC in 4 sts, 2HDC in next st* repeat around (48)
Rnd 7: *HDC in 5 sts, 2HDC in next st* repeat around (56)
Rnd 8: *HDC in 6 sts, 2HDC in next st* repeat around (64)
Rnd 9: *HDC in 7 sts, 2HDC in next st* repeat around. (72)
Rnd 10 – 21: HDC around (72) Join on last rnd.
Continue with ear flaps or end with a row of SC:
Row 22: Ch 1, SC around, join. (72) Finish off.
Ear Flaps for Adult Size
*Do not finish of on last round of beanie and continue working the first ear flap.
Row 1: Ch 1, HDC in 13 sts, turn (13)
Row 2: Ch 1, HDC2TOG, HDC 9 sts, HDC2TOG, turn. (11)
Row 3: Ch 1, HDC2TOG, HDC in 7 sts, HDC2TOG, turn. (9)
Row 4: Ch1, HDC2TOG, HDC 5 sts, HDC2TOG, turn (7)
Row 5: Ch 1, HDC2TOG, HDC in 3 sts, HDC2TOG, turn (5)
Row 6: Ch 1, HDC2TOG, HDC in next st, HDC2TOG (3) finish off
*skip 16 sts and sl st in the next st. Repeat rows 1-6 for the second ear flap. Do not finish off on last row of second ear flap. SC around the entire hat, join, finish off.

Adding Braids to Ear Flaps
Cut 24 strips of white yarn 20″ long. Attach 4 strands together to each of the 3 sc from the bottom of the ear flaps. This will give you 12 strips of yarn on each ear flap. Braid them together somewhat tight. Tie a knot of all the strands together at the end. Cut the yarn so it is even across. See post HERE.
From the Basic Hat Crochet Pattern, you can add colors or details or anything you want. See the Santa Baby Hat if you are wanting some ideas of what you can do with a Basic Hat Pattern.
If you are looking for a messy bun beanie (MBB), check out my Everyday MBB, ZigZag MBB, and Gracie Messy Bun Beanie patterns. If you are looking for some beanies with textured stitches, check out the Ana Beanie, Snow Beanie, Chunky Snow Beanie, Braided Cable Beanie or Coffee Bean Beanie.
Looking to add a cute pom pom to the top of your Basic Hat? Check out my step-by-step instructions on how to make your own yarn pom pom by hand…no pom pom maker or tool necessary! Or you could add a cute, trendy faux fur pom pom by using my for MUCH cheaper that buying premade ones!
An ad-free PDF version of this pattern to print can be found on Ravelry HERE
Save for later or share with others using the share buttons at the top and bottom of post. If you have any questions please comment below or you can email me at jessica@crochetitcreations.com.
I love to see photos of your work and read your comments. Follow Crochet It Creations on all of your favorite social media sites! Join my Crochet It Creations Crochet Friends Facebook group to further connect!
You may sell your items made from my patterns. Please do not use my photos as your own to sell your work. A link back to my site is much appreciated when selling your items from my patterns. I hope you enjoy!
This site is supported by advertisers and may contain affiliate links. See copyright & disclosure policy here for more information.

A great site for crochet patterns.
For the ear flaps for the adult size, is leaving 10 sts in between the ear flaps correct? Because the 6-10 year old size is 14 sts, just wanted to be sure 10 for the adult size was correct. Thanks!
It’s 16 sts
When doing the ear flaps, you only state to chain 2 and then hdc in the required number of stitches. You don’t say how to continue between finishing off and chaining 1. It makes no sense since I have to rejoin my yarn somewhere, but have no idea where, especially since you state that the earflaps are off-centered. What comes between fastening off and chaining 1 for the beginning of the ear flaps?
Instead of finishing off on the last round make the first ear flap. I guess that is confusing and I will add that to the post.
It says pattern doesn’t join but then the last rows counting 40 says join at first stitch
You use a stitch marker to mark the last stitch of each round and work in a spiral. Then join on the last round.
[…] flaps: Crochet it Creations Ear flaps for Adult SizeBraids: Crochet it […]