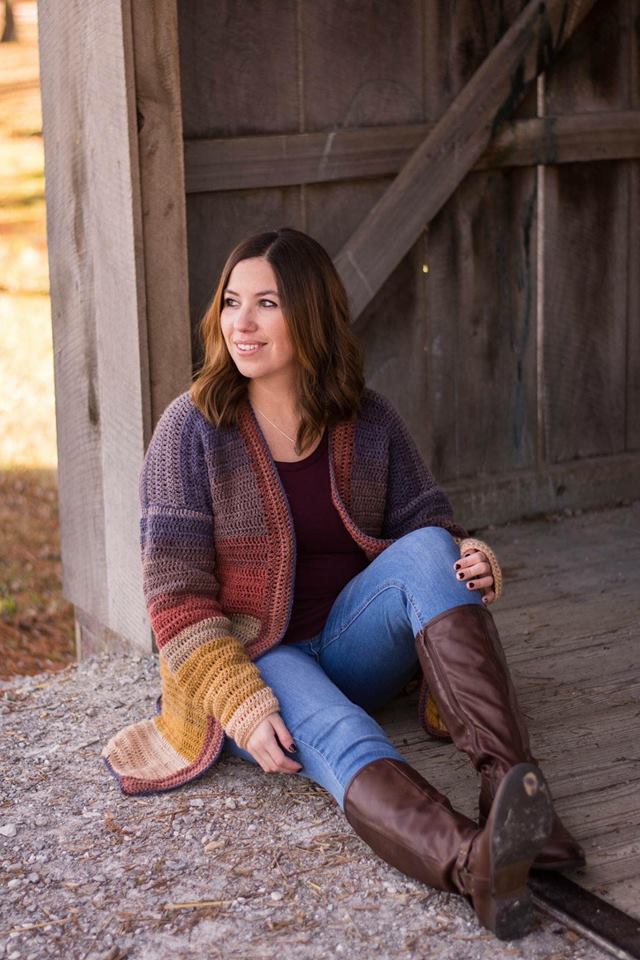
The Cooper Cardigan is an adult pattern using light weight yarn. It comes in adult sizes Small through 3XL. Make using your favorite colors of Lion Brand Mandala or Yarn Bee Baby Bee found at Hobby Lobby!
It requires VERY little sewing and no sewing separate pieces together! I am not a fan of sewing, I prefer to crochet as much as possible. So, you will find that my patterns require little to none. I also don’t like sewing separate pieces together because I find it hard to line them up to be even.
The body of the Cooper Cardigan is worked in 1 long piece. The sides are sewn together leaving arm holes. Then sleeves are added. It is fairly simple to work using basic crochet stitches and repeats. A perfect project for a weekend binge watching Netflix.
You will love wearing this cardigan to stay warm during those mild weather days. It is fairly true to size with a little relaxed fit. It stretches slightly as worn. Chart measurement is included to assure size and fit.
If you are interested in using a self-striping yarn like Mandala in the photos and unsure how to plan the colors. See HERE for how to Color Block with Self=Striping yarn.
Prefer a PDF version that’s ad-free to print? Find it HERE on Ravelry!

Cooper Cardigan Crochet Pattern by Crochet it Creations
Materials Needed
- Size H 5.0mm Crochet Hook or size to obtain gauge
- Light #3 Yarn, see chart for yardage
- Scissors
- Tapestry Needle
Gauge
- 4” square = 16 dc x 9 rows
Stitches Used/Abbreviations (U.S. Terms)
- DC – Double Crochet
- SC – Single Crochet
- DC2TOG – Decrease Double Crochet
- Join – Slip Stitch to First St
Pattern Notes
- Row 1 uses foundation row. See HERE how to make foundation rows.
- Beginning chain of each row DOES NOT count as a stitch
- Garment body is made in 1 piece starting at the bottom back
- Sleeves are worked in the round and joined, but are turned on each row to get the same look as the body
- Stitch count is listed in parenthesis with small being first and in order to 3XL. If no parenthesis are listed then that count applies to all sizes.
- Find an ad-free version to print HERE on Ravelry!
| Size | Yardage Used | Fits Bust | Garment Bust Measurement | Back Panel Stitch Count | Length | Back Panel Row Count |
| Small | 1600 | 32-34” | 38” | 76 DC | 27” | 61 Rows |
| Medium | 1700 | 36-38” | 42” | 84 DC | 27.5” | 62 Rows |
| Large | 1900 | 40-42” | 46” | 92 DC | 28” | 63 Rows |
| XL | 2100 | 44-46” | 50” | 100 DC | 28.5” | 64 Rows |
| 2XL | 2300 | 48-50” | 54” | 108 DC | 29” | 65 Rows |
| 3XL | 2500 | 52-54” | 58” | 116 DC | 29.5” | 66 Rows |
All Sizes Body – work stitch count for your size
Back
Row 1: Foundation DC 76(84, 92, 100, 108, 116). turn
Row 2 – 61(62, 63, 64, 65, 66): ch 2, dc in across. turn (76,84,92,100,108,116) turn
Do not finish off. Continue on to the front panels.
Right Panel
Row 62(63, 64, 65, 66, 67): ch 2, dc in 28(32, 34, 38, 40, 44) st. turn
Row 63(64, 65, 66, 67, 68) – 122(124, 126, 128, 130, 132): ch 2, dc in each st across. turn. (28,32,34,38,40,44) Finish off on last row.
Left Panel – Join to the top of dc on other side of last row worked for back panel
Row 62(63, 64, 65, 66, 67): ch 2, dc in 28(32, 34, 38, 40, 44) st. turn
Row 63(64, 65, 66, 67, 68) – 122(124, 126, 128, 130, 132): ch 2, dc in each st across. turn (28,32,34,38,40,44) Finish off on last row.
Front Border – join to bottom inside of right panel
Row 1: ch 2, dc up the inside of the panel, dc2tog in the corner of front panel/neck, dc across neck, dc2tog in other corner, dc back down the other panel. Turn
Row 2-4: ch 2, dc in each st around, placing dc2tog in each neck corner. Turn
Row 5: ch 1 (does not count as st), sc around the front border. Turn and continue to sc around the ENTIRE garment, placing 3 sc in each corner. (sc across the bottom, up the sides of the panel, etc.) join to first sc. *Important to place sc evenly on the ends of the dc rows. Ex: 1 sc in the bottom side of the dc and 1 sc in the top side of the dc. Finish off.

Fold garment in half at the shoulders. Place stitch markers 12 dc rows from the bottom in the front and 14 dc rows from the bottom in the back. This will give a slit in the side of the cardigan at the bottom. You can make the slit longer or shorter if you prefer. 
Count down 14(15,16,17,18,19) dc rows from the top of the shoulder on the front and the back and place stitch marker. This will give you 56(60,64,68,72,76)stitches for the sleeve, if you placed sc evenly on the ends of the dc rows. Count to make sure you have correct number of stitches for the arm hole/sleeve.
Whip stitch each side together between the stitch markers.
Pockets (2)
Ch 22
Row 1: dc in 4th ch from hk and each ch across. (20) turn
Row 2-13: ch 2, dc in each st across (20) turn
Row 14: ch 1, sc across. Turn and work down the side of the rows, across the bottom, up the other side and join. Finish off leaving a long tail to attach.
Sew pockets on approximately 12 rows up from the bottom to each side of front panel.

Continue on to appropriate sleeve size….
Small Sleeves
Rnd 1: sl st to bottom of sleeve hole. Ch 2, dc in same st and each st around. Join. Turn (56) Rnd 2: ch 2, dc2tog. dc in each st around. Join. Turn (55)
Rnd 3: ch 2, dc2tog. dc in each st around. Join. Turn (54)
Rnd 4: ch 2, dc in each st around. Join. Turn (54)
Rnd 5 – 31: repeat rows 2 – 4 ends with 36 st
Row 32 – 37: ch 2, dc2tog. dc in remaining st around. Join. Turn (35) ends with 30 st
Rnd 38: ch 2, dc around. Join. Turn (30)
Row 39 & 40: ch 1, sc around. Join (30) finish off. Weave in ends.
Medium Sleeves
Rnd 1: sl st to bottom of sleeve hole. Ch 2, dc in same st and each st around. Join. Turn (60)
Rnd 2: ch 2, dc2tog. dc in each st around. Join. Turn (59)
Rnd 3: ch 2, dc2tog. dc in each st around. Join. Turn (58)
Rnd 4: ch 2, dc in each st around. Join. Turn (58)
Rnd 5 – 25: repeat rows 2 – 4 ends with 44 st
Row 26 – 37: ch 2, dc2tog. dc in remaining st around. Join. Turn (43) ends with 32 st
Rnd 38: ch 2, dc around. Join. Turn (32)
Row 39 & 40: ch 1, sc around. Join (32) finish off. Weave in ends.
Large Sleeves
Rnd 1: sl st to bottom of sleeve hole. Ch 2, dc in same st and each st around. Join. Turn (64)
Rnd 2: ch 2, dc2tog. dc in each st around. Join. Turn (63)
Rnd 3: ch 2, dc2tog. dc in each st around. Join. Turn (62)
Rnd 4: ch 2, dc in each st around. Join. Turn (62)
Rnd 5 – 19: repeat rows 2 – 4 ends with 52 st
Row 20 – 37: ch 2, dc2tog. dc in remaining st around. Join. Turn (51) ends with 34 st
Rnd 38: ch 2, dc around. Join. Turn (34)
Row 39 & 40: ch 1, sc around. Join (34) finish off. Weave in ends.
Extra Large Sleeves
Rnd 1: sl st to bottom of sleeve hole. Ch 2, dc in same st and each st around. Join. Turn (68)
Rnd 2: ch 2, dc2tog. dc in each st around. Join. Turn (67)
Rnd 3: ch 2, dc2tog. dc in each st around. Join. Turn (66)
Rnd 4: ch 2, dc in each st around. Join. Turn (66)
Rnd 5 – 15: repeat rows 2 – 4 ends with 60 st
Row 16 – 37: ch 2, dc2tog. dc in remaining st around. Join. Turn (59) ends with 36 st
Rnd 38: ch 2, dc around. Join. Turn (36)
Row 39 & 40: ch 1, sc around. Join (36) finish off. Weave in ends.
2XL Sleeves
Rnd 1: sl st to bottom of sleeve hole. Ch 2, dc in same st and each st around. Join. Turn (72)
Rnd 2: ch 2, dc2tog. dc in each st around. Join. Turn (71)
Rnd 3: ch 2, dc2tog. dc in each st around. Join. Turn (70)
Rnd 4: ch 2, dc in each st around. Join. Turn (70)
Rnd 5 – 7: repeat rows 2 – 4 ends with 68 st
Row 8 – 37: ch 2, dc2tog. dc in remaining st around. Join. Turn (67) ends with 38 st
Rnd 38: ch 2, dc around. Join. Turn (38)
Row 39 & 40: ch 1, sc around. Join (38) finish off. Weave in ends.
3XL Sleeves
Rnd 1: sl st to bottom of sleeve hole. Ch 2, dc in same st and each st around. Join. Turn (76)
Rnd 2 – 37: ch 2, dc2tog. dc in each st around. Join. Turn (75) ends with 40 st
Rnd 38: ch 2, dc around. Join. Turn (40)
Row 39 & 40: ch 1, sc around. Join (40) finish off. Weave in ends.

If you are using a yarn like Lion Brand Mandala Cake, then you can color block like this. See post HERE about color blocking.


Prefer a PDF version that’s ad-free to print? Find it HERE on Ravelry!
Save for later or share with others using the share buttons at the top and bottom of post. If you have any questions please comment below or you can email me at jessica@crochetitcreations.com.
I love to see photos of your work and read your comments. Follow Crochet It Creations on all of your favorite social media sites! Join my Crochet It Creations Crochet Friends Facebook group to further connect!
You may sell your items made from my patterns. Please do not use my photos as your own to sell your work. A link back to my site is much appreciated when selling your items from my patterns. I hope you enjoy!
This site is supported by advertisers and may contain affiliate links. See copyright & disclosure policy here for more information.


This is gorgeous! I have a slug of mandala yarn,I’d love to use for this, but how do you get ithe stripes to line up so perfectly?
I have a post I need to finish up on how to color block with self striping yarn. You have to plan it out a little.
Great! I look forward to seeing it! Thanks.
Love this pattern and colors.
What size is shown that you made? I would like to color block one, but was wondering how much the difference in sizes would make.
Thanks! Can’t wait to get started!
I believe I made the medium
Crocheting along nicely doing the color blocking version. I’m at the part of whip stitching the sides together. For the color blocking you must have kept the front and back even so the colors matched up the sides, making sure you have the correct amount of armhole stitches for size crocheting?
Will my shoulder count down still be the same? For size medium the pattern says 15.
Did you crochet pockets on your color blocked cardigan? From looking at the photos I can’t see any, but I was wondering if you altered the pocket to have it less noticeable on the color blocking.
I did not add pockets to that one