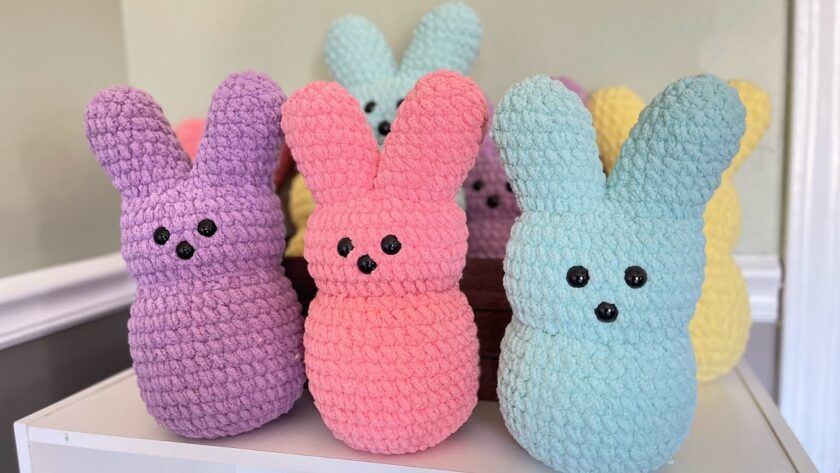
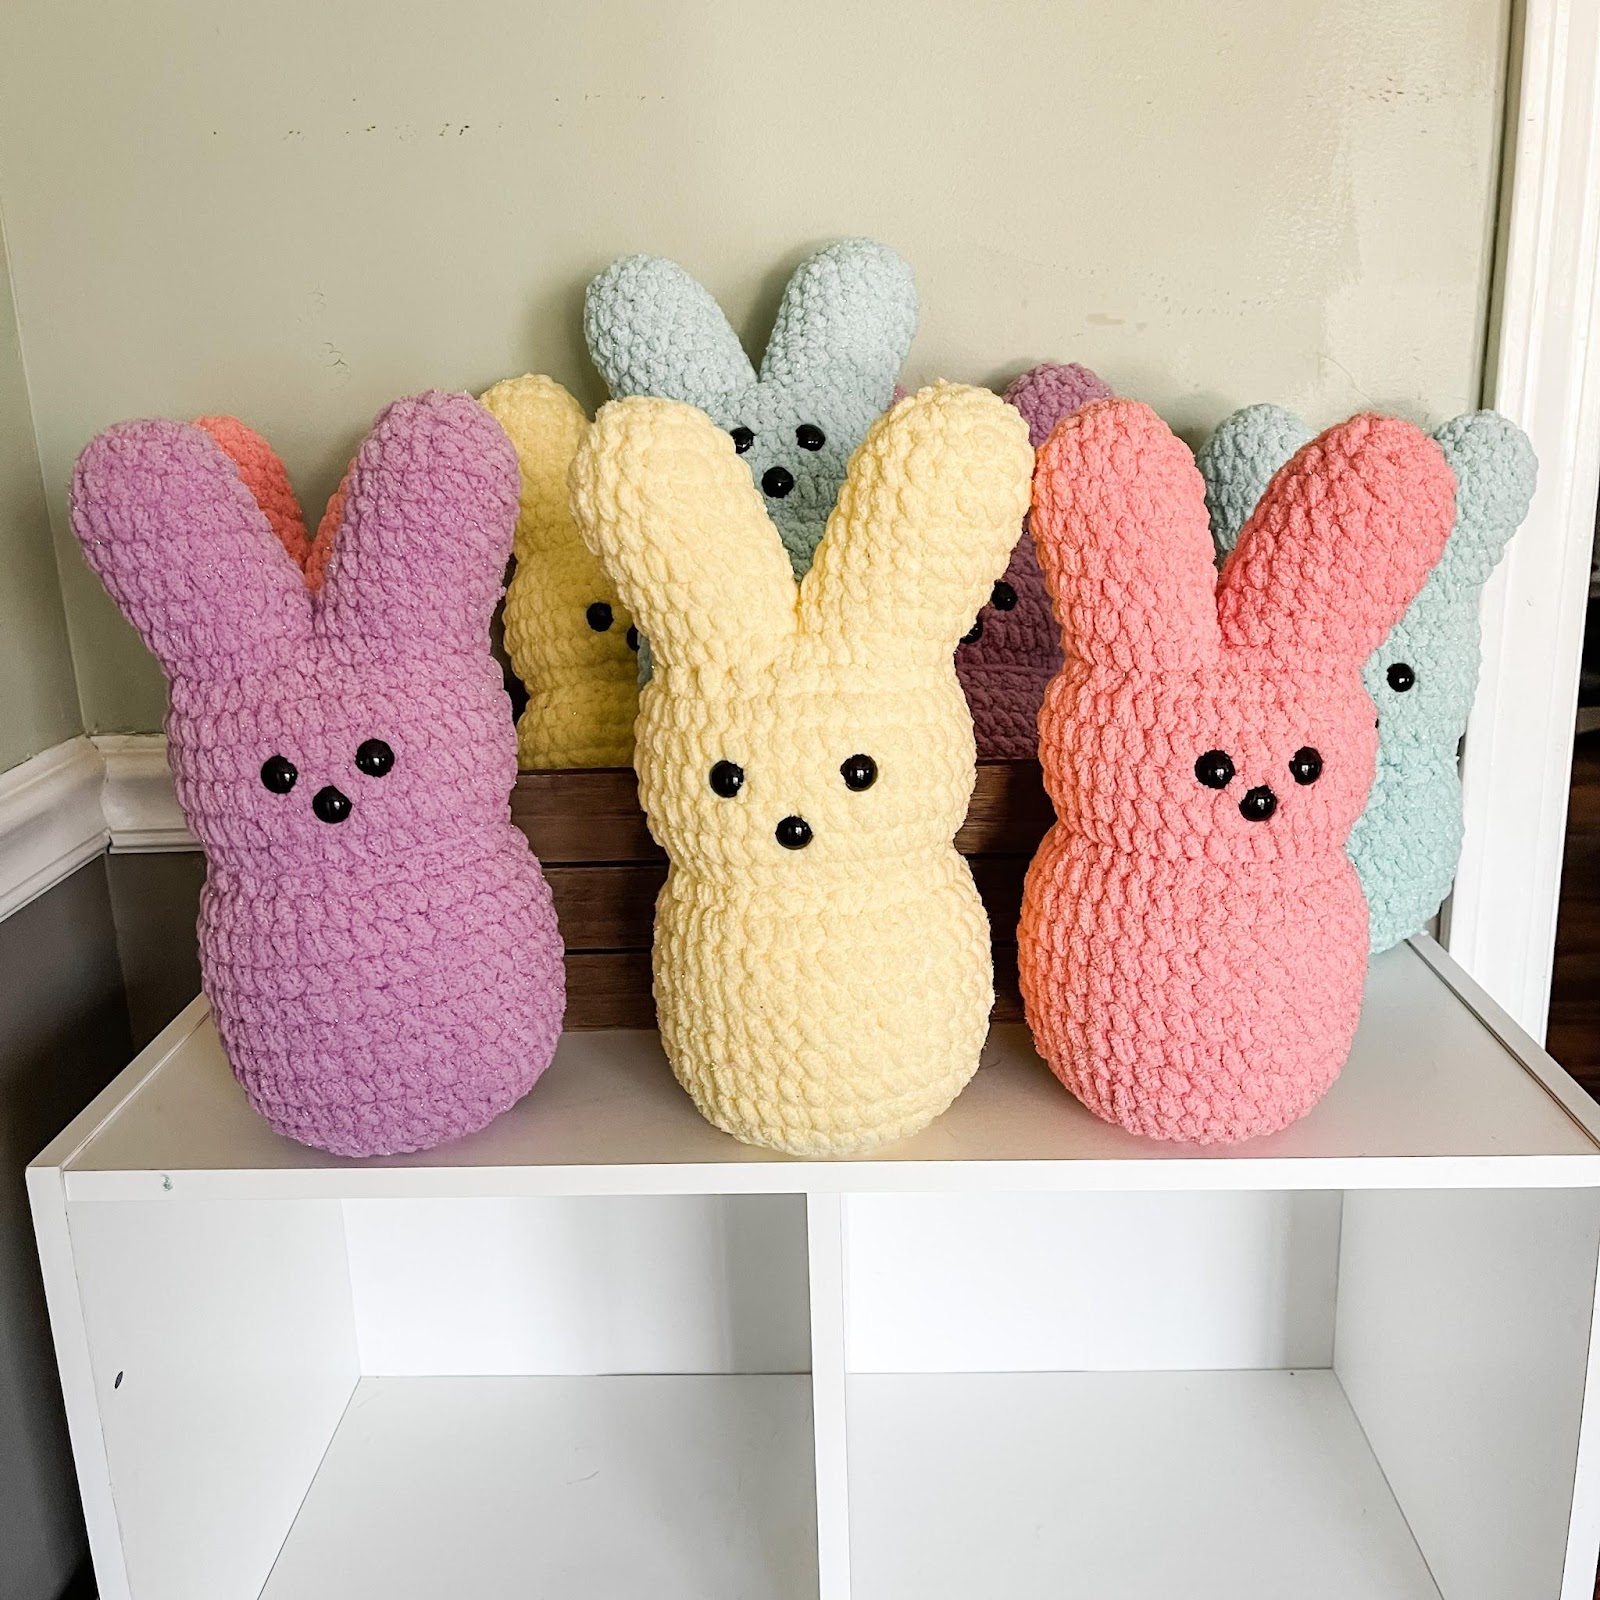
The Marshmallow Bunny is so adorable and ultra plushy! You will want to make these for everyone in your family this Spring or sell at your local craft shows!
This Easter Bunny is made from Bernat Baby Blanket Yarn. I used Sparkle in the photos which comes in pastel colors. They can be found at your local Joann’s Store. One skein makes 2 bunnies.

If you are new to amigurumi, this marshmallow bunny is perfect for you. It is worked from the bottom up in one piece. No sewing at all! Basic single crochet stitches are used and worked in the round.
This adorable bunny crochet pattern is inspired by your favorite Easter Marshmallow candy – Peeps!!
I hope you enjoy this pattern. If you would like a PDF copy without ads to print, please check out my Etsy Shop HERE. Thank you for supporting my small business. Every purchase, view, and share helps support this business and my family. Thank you!
Crochet Pattern by Jessica Cooper
Crochetitcreations.com
Copyright 2022
Materials Needed
- J 6mm Crochet Hook
- Bernat Baby Blanket Sparkle Yarn in Sunshine Sparkle (6 Super Bulky, 100% Polyester, 10.5 oz/300g, 220yds/201m) – 1 skein makes 2 bunnies
- 3 – 14mm Safety Eyes
- Poly-Fil
- Scissors
- Tapestry Needle
- 4 stitch markers
Gauge
- 4” square = 9 rows x 12 SC stitches
Stitches Used/Abbreviations (US Terms)
- SC – Single Crochet
- Sl St – Slip Stitch
- Ch – Chain
- SC2TOG – Single Crochet 2 Stitches Together
- Join – Sl St to the first stitch of the round
- St(s) – Stitch(es)
Pattern Notes
- Finished Marshmallow Bunny measures approximately 10” tall.
- Bunny is worked from the bottom up in one piece.
Body of Bunny
Rnd 1: In Magic Circle ch 1, 10 SC, join. (10)
*TIP – pull the slip stitch tight after joining to lessen the visibility of it. Do not pull too hard as blanket yarn will break. If you see the join, then work in a spiral using a stitch marker to mark the last stitch of each round.**
Rnd 2: Ch 1, 2SC in each st around, join. (20)
Rnd 3: Ch 1, [SC in 1 st, 2SC in next] around, join. (30)
Rnd 4: Ch 1, [SC in 2 sts, 2SC in next] around, join. (40)
Rnds 5 – 21: Ch 1, SC around, join. (40)
Do Not Finish Off.
Lay the Bunny body flat in front of you with the join on the right side of your work. Add safety eyes centered in the front of the round between rounds 17 &18 with 4 stitches between them.
Add a nose using a 14mm safety eye to round 16 centered between the eyes.
Photo 1: Finished body of bunny with safety eyes and nose attached

Stuff the body with Poly-Fil.
Working Individual Bunny Ears
Right Ear
Rnd 1: Ch 1, SC in 10 sts, skip 20 sts, SC in the remaining 10 sts, join. (20)
Rnd 2: Ch 1, 2SC in 1 st, SC in 7 sts, SC2TOG x 2, SC in 7 sts, 2SC in last st, join. (20)
Rnd 3: Ch 1, SC around, join. (20)
Rnd 4: Ch 1, 2SC in 1 st, SC in 7 sts, SC2TOG x 2, SC in 7 sts, 2SC in last st, join. (20)
Rnd 5: Ch 1, SC around, join. (20)
Rnd 6: Ch 1, [SC in 3 sts, SC2TOG] around, join. (16)
*start stuffing the ear*
Rnd 7: Ch 1, [SC in 2 sts, SC2TOG] around, join. (12)
Rnd 8: Ch 1, [SC in 1 st, SC2TOG] around, join. (9) Finish stuffing the ear and fasten off. Close the hole and weave in the ends.
Photo 2: Bunny Body completed and first 2 rows of Right Ear.

Left Ear
Count over 10 sts from the right ear and join with a slip stitch in the next st. This will be on the far left when looking at the front of the bunny.
Rnd 1: Ch 1, SC in 10 sts, moving to the front of the bunny – SC in the remaining 10 sts, join. (20)
Rnd 2 – 8: follow right ear instructions.
You may notice there is a hole between the ears, this will close when you shape the body.
Shaping the Body
Using 4 stitch markers mark between rows 14 & 15 and rows 20 & 21 on the front and the back of the bunny.
Shaping the head & body – Using a tapestry needle, take a strand of yarn about 24” long, weave in and out of the stitches between rows 14 & 15. Remove the stitch marker and pull the strand of yarn tight to cinch. Be careful not to pull too hard as blanket yarn will break. Knot and repeat to the back. Pull tight and knot again. Weave in the ends.
Shaping between head and ears – Repeat for rows 20 & 21.
Photo 3: Rows marked for shaping the body.

Row 4: Shaping the body


If you have any questions please email me at jessica@crochetitcreations.com. I would love to see photos of your work. Follow Crochet It Creations on all of your favorite social media sites. Join us in our crochet friends Facebook group!
You may sell your items made from my patterns. You may not distribute any of this pattern in any way. It is for your use only. Please do not use my photos as your own to sell your work. A link back to my site or social media tag is much appreciated when selling your items from my patterns. I hope you enjoy!

Save for later or share with others using the share buttons at the top and bottom of post. If you have any questions please comment below or you can email me at jessica@crochetitcreations.com.
I love to see photos of your work and read your comments. Follow Crochet It Creations on all of your favorite social media sites! Join my Crochet It Creations Crochet Friends Facebook group to further connect!
You may sell your items made from my patterns. Please do not use my photos as your own to sell your work. A link back to my site is much appreciated when selling your items from my patterns. I hope you enjoy!
This site is supported by advertisers and may contain affiliate links. See copyright & disclosure policy here for more information.