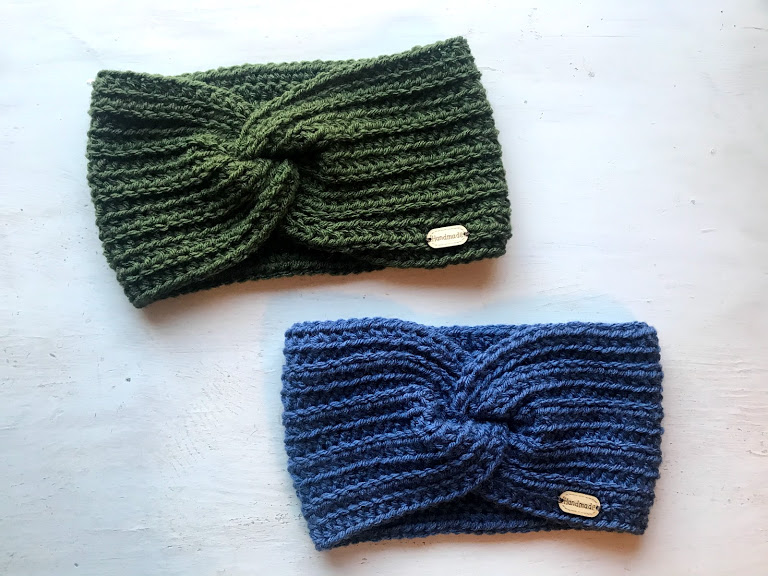
Ear Warmers are one of my favorite items to crochet! They work up quick and look super cute on. The Mainstream Ear Warmer is full of trendy looks with using minimal yarn and effort.
The Mainstream Crochet Ear Warmer has texture to the stitches with a cute twist in the front. These twisted headbands are popular this year. They look more difficult to make than they actually are.

<a data-pin-do="buttonFollow" href="https://www.pinterest.com/pinterest/">Pinterest</a>Mainstream Ear Warmer Crochet Pattern
Materials Needed
- H 5mm Crochet Hook, or size needed to obtain gauge
- 100yds or less of Medium #4 Weight Yarn (Hobby Lobby I Love This Yarn used in photos, 100% acrylic yarn)
- Scissors
- Tapestry Needle
- Optional: Tag or Wooden Button
Gauge
- 4” square = 9 Rows x 15 HDC
Stitches Used/Abbreviations (US Terms)
- HDC – Half Double Crochet
- FHDC – Foundation Half Double Crochet
- Sl St – Slip Stitch
- Ch – Chain
- FLO – Front Loop Only
- BLO – Back Loop Only
- WS – Wrong Side
- RS – Right Side
Pattern Notes
- Beginning chain DOES NOT count as a stitch
- Pattern is made in a rectangle with sides folded in after and sewn as a twist
- Due to the nature of the stitches, the ear warmer stretches for the larger sizes. The adult will stretch to fit up to 22” head circumference.
Chart 1: Stitch Count and Ending Row
| Size | Measurements | FHDC | Ending Row |
| NB | 12”L x 2.5”W | 45 | 6 |
| 3M | 13”L x 2.5”W | 48 | 6 |
| 6M | 14”L x 3”W | 52 | 7 |
| 1Y | 15”L x 3.75”W | 56 | 8 |
| 2Y | 16”L x 4”W | 60 | 9 |
| 3-5Y | 16.5”L x 4.25”W | 61 | 10 |
| 6-10Y | 17.5”L x 4.5”W | 65 | 11 |
| Adult | 18”L x 5”W | 67 | 12 |
Start Ear Warmer Here – Making a Rectangle
Row 1 (WS): FHDC to # listed in Chart 1, turn.
Row 2 (RS): Ch 1, HDC BLO across, HDC in BOTH loops of last st, turn.
Row 3 (WS): Ch 1, HDC FLO across, HDC in BOTH loops of last st, turn.
Rows 4 – # listed in Chart 1: Repeat rows 2 & 3
Finish off leaving a long tail for sewing the twist.
Lay rectangle flat with RS facing up. Fold in each side (see photo 2) with RS facing together. Interlock the two “V’s” from each side (see photo 3). Sew the folds together going through all 4 layers. Sew all the way across going back and forth. Weave in ends. Turn Ear Warmer right side out. Optional to attach a tag or button.
Photo 1: Finished Rectangle
Photo 2: With RS facing up, fold in each side
Photo 3: Interlock the “V’s” from each side
Photo 4: Sew through all 4 layers
Photo 5: Sew across going through all 4 layers
Photo 6: Turn Ear Warmer Right Side Out

Mainstream Ear Warmer & Beanie in 8 sizes
I got my adorable custom made tags from thebeamcity.com. They make laser etched tags in leather or cork.
Save for later or share with others using the share buttons at the top and bottom of post. If you have any questions please comment below or you can email me at jessica@crochetitcreations.com.
I love to see photos of your work and read your comments. Follow Crochet It Creations on all of your favorite social media sites! Join my Crochet It Creations Crochet Friends Facebook group to further connect!
You may sell your items made from my patterns. Please do not use my photos as your own to sell your work. A link back to my site is much appreciated when selling your items from my patterns. I hope you enjoy!
This site is supported by advertisers and may contain affiliate links. See copyright & disclosure policy here for more information.


