Prefer a PDF version to print? Get it HERE from Ravelry with all the sizes together.
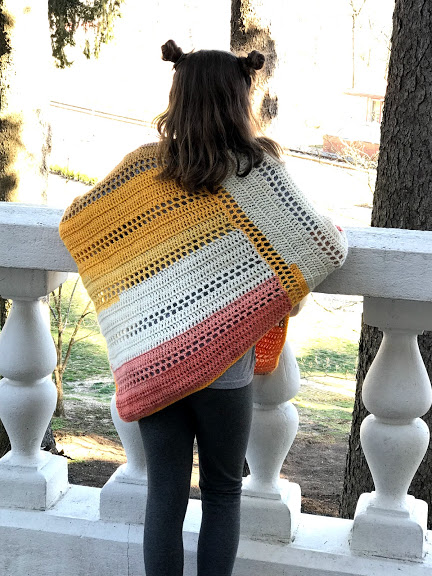
The Peaceful Poncho is a light weight poncho using Lion Brand Mandala Yarn. It is perfect for these spring months or cooler days all year around.
This post is for the Child Size which comes in Toddler (2-3t), Child Small (4-8), Child Large (10-14), and Teen Sizes (16, or adult small). Find the Adult Sizes HERE which is standard adult and plus size! You can make a poncho for the whole family!
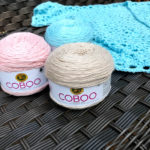
Photos are worked using Lion Brand Mandala Yarn. It is a light #3 yarn, you can substitute any yarn in the same weight making sure to check gauge. I use Clover Amour crochet hooks. They are my favorite because of the ergonomic handle and the smooth glide.
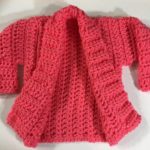
Pattern is worked making 2 rectangles. Rectangles are sewn together in an L shape then folded over to sew the other sides together. There is a small opening for the neck at the top then the V is for the bottom opening.

Materials Needed
- I 5.5mm Crochet Hook
- Lion Brand Mandala, or any Light #3 Yarn
- Scissors
- Tapestry Needle
Gauge
- 4” square = 15 DC x 8 Rows
Stitches Used/Abbreviations (US Terms)
- DC – Double Crochet
- SC – Single Crochet
- Sl St – Slip Stitch
- SC2TOG- Single Crochet 2 Stitches Together
- Chainless Standing Double Crochet
Pattern Notes
- Pattern uses the Chainless Standing Double Crochet, which creates a DC for the next row without chaining. You can replace the Standing DC with a chain 3 to count as a stitch.
- Panels start with a foundation row. Or you can replace with chains.
- Stitch count at end of row in parenthesis includes stitches and any ch 1/skipped stitch.
- Pattern is worked making 2 rectangle panels. Then the panels are sewn together in an “L” shape. See chart and photos at end of pattern
Toddler Size
Make 2 rectangle panels
Row 1: Foundation DC 44. (44) turn
OR ch 46, DC in 4th ch from hook. Beginning ch 3 will count as a stitch (44) turn
Row 2 – 5: Standing DC in same st (or Ch 3 to count as DC) and each st across. (44) turn
Row 6: Standing DC in same st. *Ch 1, sk 1 st. DC in next st.* repeat across. DC in last st. (44) turn *note that the end of the row has 2 DC next to each other*
Row 7: Standing DC in same st. *ch 1, sk 1 st. DC in ch-1 sp* repeat across. DC in last st. (44) turn
Row 8 – 12: Standing DC in same st and each st across. (44) turn
Rows 13 – 35: Repeat rows 6 – 12. It will end with row 7 (a chain space row)
Continue on to the sewing panels together section of the pattern
Child Small Size
Make 2 rectangle panels
Row 1: Foundation DC 55. (52) turn
OR ch 54, DC in 4th ch from hook. Beginning ch 3 will count as a stitch (52) turn
Row 2 – 5: Standing DC in same st (or Ch 3 to count as DC) and each st across. (52) turn
Row 6: Standing DC in same st. *Ch 1, sk 1 st. DC in next st.* repeat across. DC in last st. (52) turn *note that the end of the row has 2 DC next to each other*
Row 7: Standing DC in same st. *ch 1, sk 1 st. DC in ch-1 sp* repeat across. DC in last st. (52) turn
Row 8 – 12: Standing DC in same st and each st across. (52) turn
Rows 13 – 42: Repeat rows 6 – 12. It will end with row 7 (a chain space row)
Continue on to the sewing panels together section of the pattern
Child Large Size
Make 2 rectangle panels
Row 1: Foundation DC 60. (60) turn
OR ch 62, DC in 4th ch from hook. Beginning ch 3 will count as a stitch (60) turn
Row 2 – 5: Standing DC in same st (or Ch 3 to count as DC) and each st across. (60) turn
Row 6: Standing DC in same st. *Ch 1, sk 1 st. DC in next st.* repeat across. DC in last st. (60) turn *note that the end of the row has 2 DC next to each other*
Row 7: Standing DC in same st. *ch 1, sk 1 st. DC in ch-1 sp* repeat across. DC in last st. (60) turn
Row 8 – 12: Standing DC in same st and each st across. (60) turn
Rows 13 – 49: Repeat rows 6 – 12. It will end with row 7 (a chain space row)
Continue on to the sewing panels together section of the pattern
Teen Size
Make 2 rectangle panels
Row 1: Foundation DC 70. (70) turn
OR ch 72, DC in 4th ch from hook. Beginning ch 3 will count as a stitch (70) turn
Row 2 – 5: Standing DC in same st (or Ch 3 to count as DC) and each st across. (70) turn
Row 6: Standing DC in same st. *Ch 1, sk 1 st. DC in next st.* repeat across. DC in last st. (70) turn *note that the end of the row has 2 DC next to each other*
Row 7: Standing DC in same st. *ch 1, sk 1 st. DC in ch-1 sp* repeat across. DC in last st. (70) turn
Row 8 – 12: Standing DC in same st and each st across. (70) turn
Rows 13 – 56: Repeat rows 6 – 12. It will end with row 7 (a chain space row)
Continue on to the sewing panels together section of the pattern
Up close photo of rows, note where the last 2 DC of row 6 are next to each other.

Up close photo of row 7 with the standing DC and DC in ch-1 space.

Sewing Panels Together
Lay the rectangles out in an “L” shape. Pay attention to line up the “hole row” (ch-1 space row) next to the side of the other panel. The panel on the right’s hole row should be at the top. Use the mattress stitch to sew panels together in the “L” shape. The mattress stitch sews the panels together seamlessly, the yarn you are sewing with will not be visible.

Fold the left side over the right side, meeting up with the other corner.

Fold the top down to meet up with other panel. Making note that the hole row is meeting up with the side. Sew that seam together. Turn where the small hole is at the top for the neck opening.

Neck Border
Join to the neck with a slip stitch.
Row 1: Ch 1, sc around. Join. Finish off.
Bottom Border
Join to the bottom with a slip stitch.
Row 1: ch 1, sc around. Join.
Row 2: ch 1, sc around. Join. Finish off. Weave in all ends.
Optional to add fringe or tassels along the bottom. Steam block to relax stitches if you have rippling. Also, do not hang your crochet garments, they will stretch. Instead fold to store.

My niece here is 2.5 years old and wears a 2T. She is wearing the toddler size.

My daughter here is 9.5 years old. She wears a 10/12 and is wearing the Child Large Size.
Looking for the Adult Size? Find it HERE in standard and plus size. Small to 3XL! Or get the PDF of all sizes from Ravelry HERE
Save for later or share with others using the share buttons at the top and bottom of post. If you have any questions please comment below or you can email me at jessica@crochetitcreations.com.
I love to see photos of your work and read your comments. Follow Crochet It Creations on all of your favorite social media sites! Join my Crochet It Creations Crochet Friends Facebook group to further connect!
You may sell your items made from my patterns. Please do not use my photos as your own to sell your work. A link back to my site is much appreciated when selling your items from my patterns. I hope you enjoy!
This site is supported by advertisers and may contain affiliate links. See copyright & disclosure policy here for more information.

[…] Get the Pattern Photo: yarnspirations.com […]