Make a basic Child Crochet Cardigan with this FREE Crochet Pattern by Crochet It Creations. Keep reading for the full written instructions.
Prefer an ad-free PDF version of all sizes of the Cameo Crochet Cardigan Patterns to print? Click HERE to get the pattern from Ravelry
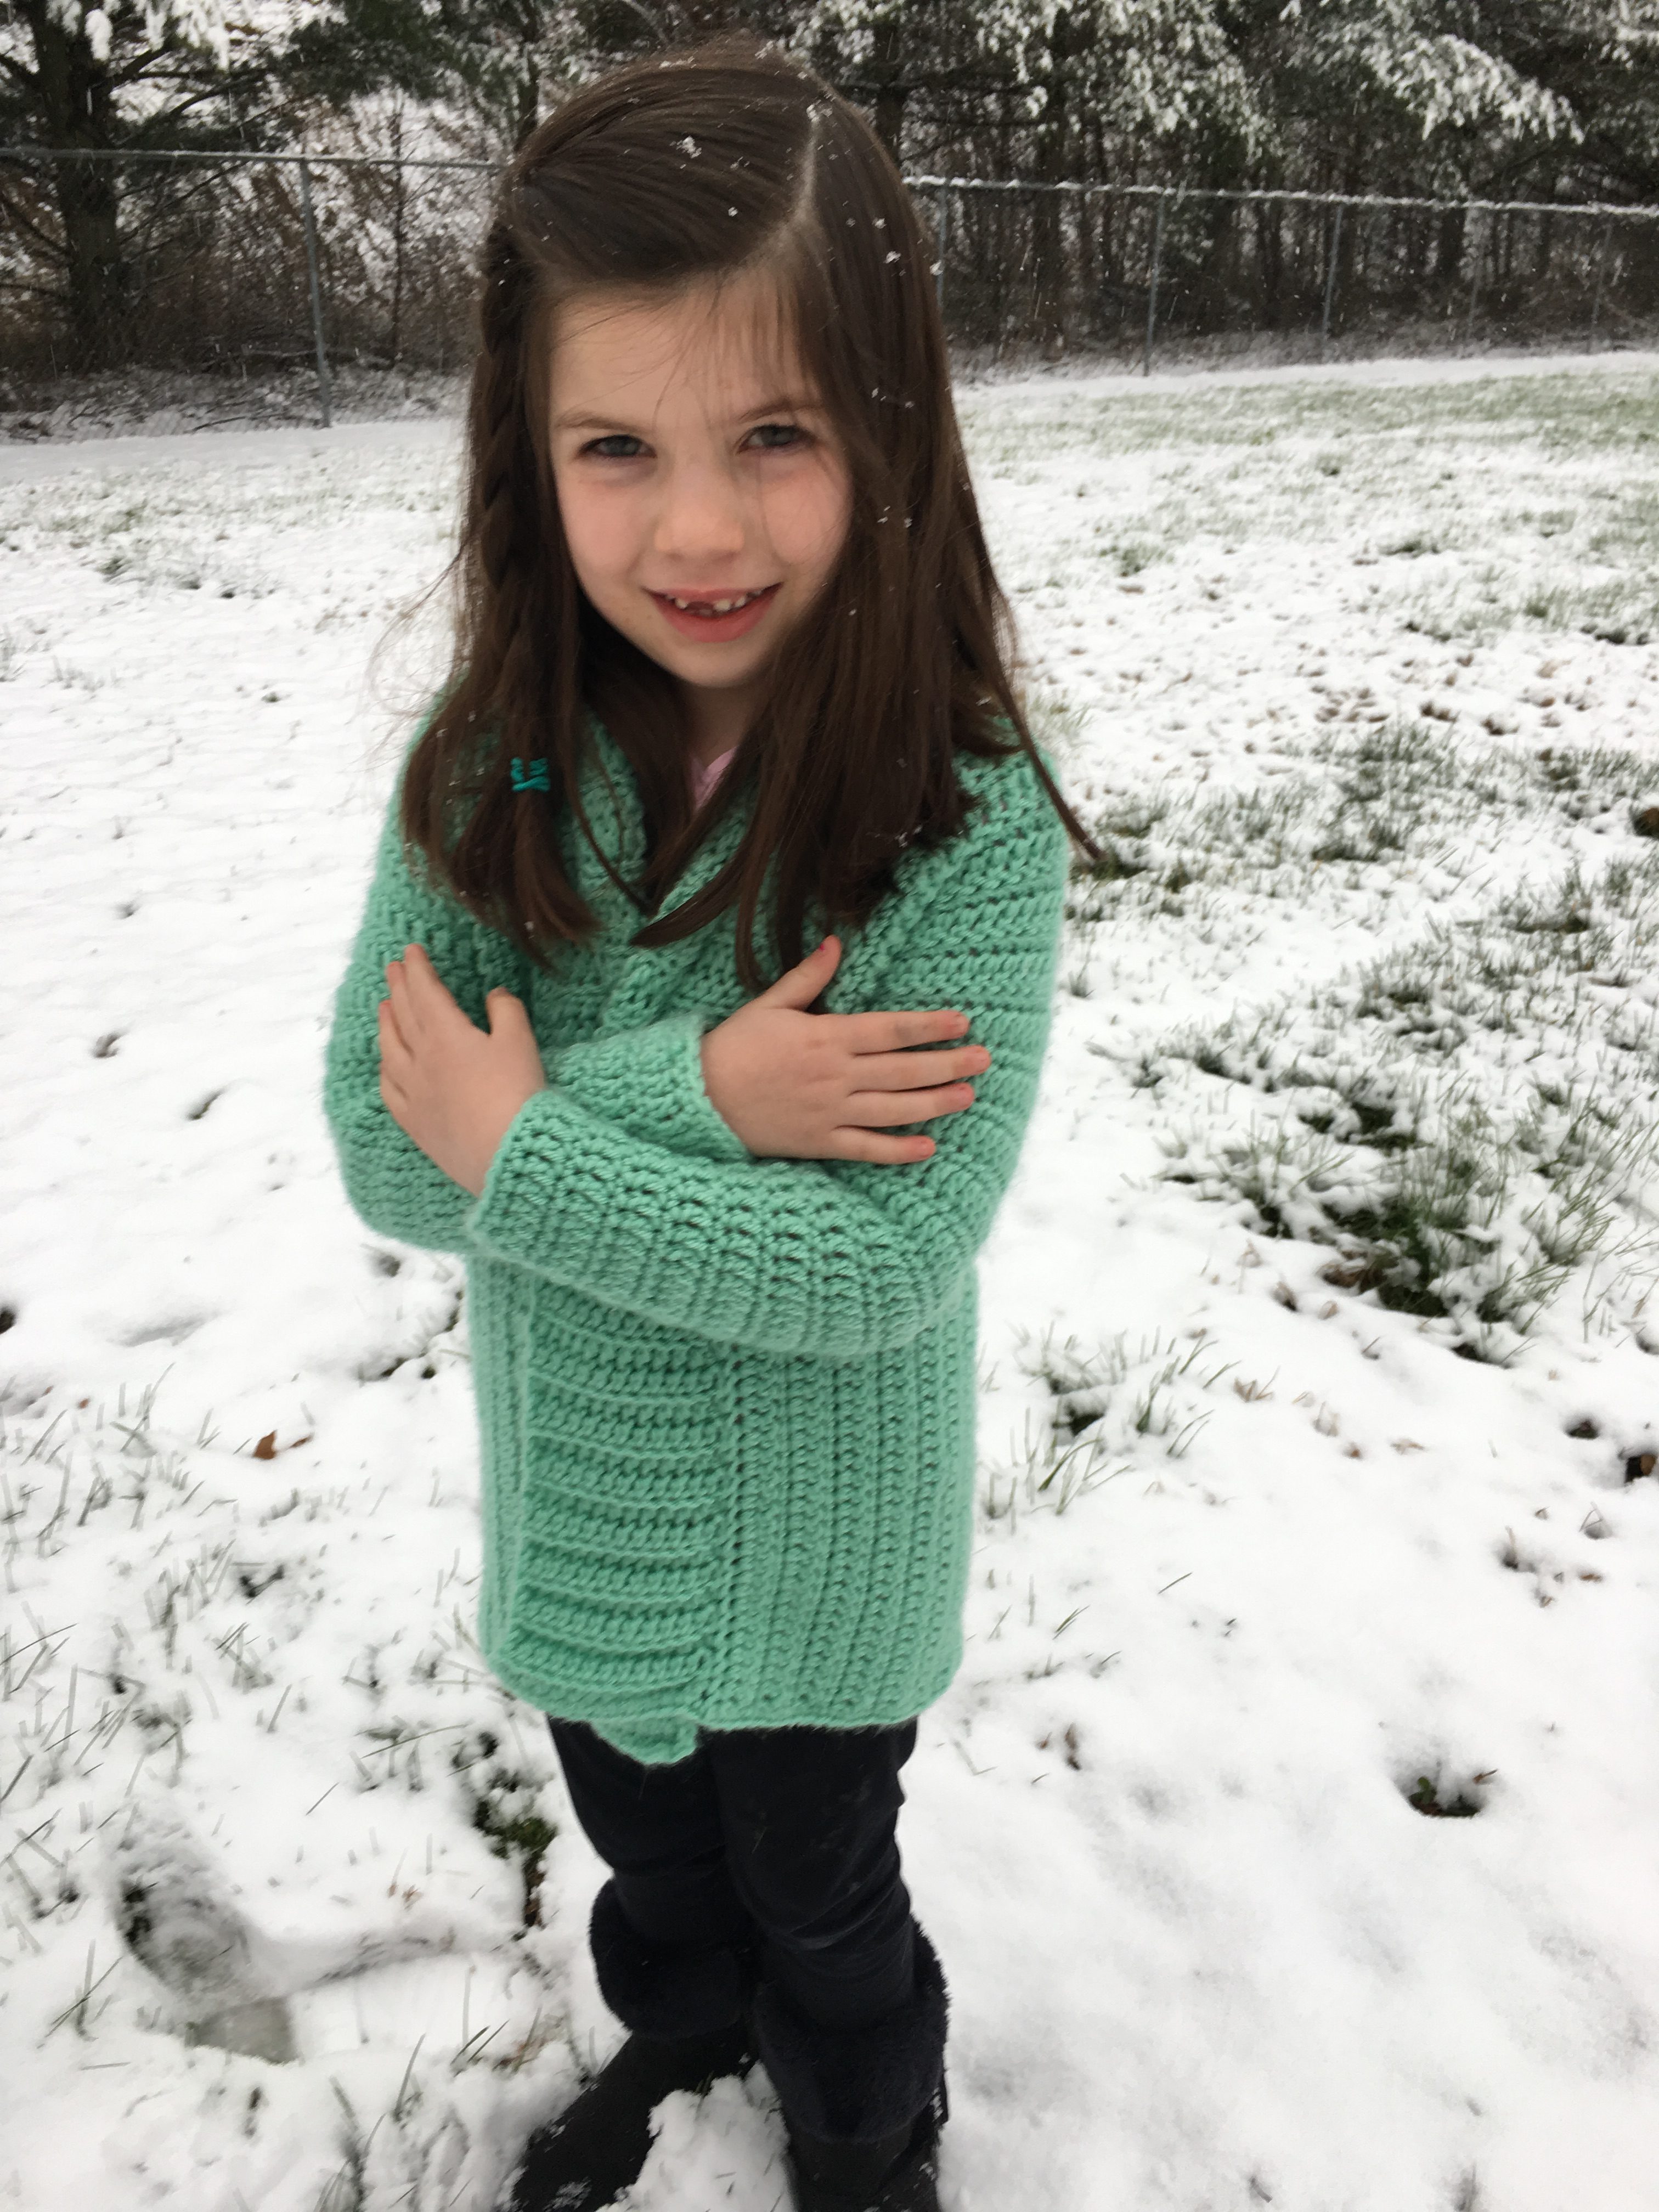
Here is the second size of the child sizes of the Cameo Cardigan Crochet Pattern by Crochet It Creations! This is Small Child Crochet Cardigan fits approximately size 6/8 in girls.
The Cameo Cardigan Crochet Pattern series ranges from baby size all the way to Women’s Size 20!!! It will have 10 different sizes that are all written separately (no color coding and stitch count in parenthesis!) The adult and child sizes PDF are available on Ravelry to purchase for a small fee.
I have worked so hard on this pattern and has taken many different tries to perfect! There was a time when I felt like I couldn’t get away from it looking like I was wearing an afghan! Then finally something clicked! And once it clicked, I was able to quickly move on to creating other sizes! And I am happy to share them with you!
Construction of the Crochet Cardigan
Pattern is worked in vertical continuous rows with no sewing. You will start at the front panel, work the back panel and join to the front panel for the shoulders, then continue on to the other front panel.
After that the front border is added then the sleeves. The adult sizes have pockets worked in to the pattern and the child sizes can be made after and sewn on.
Find more crochet cardigan sizes below…
- Find the Adult XS/S Women’s 0-6 Size here
- Find the Adult Medium/Large Women’s 8-12 Size here
- Find the Adult XL/2XL Women’s 14-20 Size here
- Purchase the Ad-Free, Printable PDF of the Adult and Child sizes together from Ravelry here
- Find the Child Size Large 10/12 here
- Find the preschool size here
- Find the toddler size here
- Find the baby size here
Need help with the Cameo Cardigan? See Part 1 of 2 video here from start to completing the body of the cardigan. And the part 2 or 2 of the sleeves here.

- Get the PDF version to print from Ravelry HERE
- Get the PDF version from Etsy HERE
- Pin the Small Child Crochet Cardigan Pattern for later HERE
- See the full video tutorial on YouTube HERE
Materials Needed
- K 6.5mm Crochet Hook, or hook to obtain gauge
- Worsted Weight #4 yarn – approx 650 yards for Child Small 6/8
- Scissors
- Tapestry/Finishing Needle
- Optional: Stitch Markers
Stitches Used (U.S Terms)
- DC – double crochet
- HDC – half double crochet
- SC – single crochet
- Sl St – slip stitch
- BLO – back loop only
- Join – slip stitch to first st
- DC2TOG – decrease double crochet
- SC2TOG – decrease single crochet
- Foundation single crochet
Gauge
- 4” square = 9 rows of the pattern x 12 stitches.
Pattern Notes & Tips
- Beginning chain(s) of the row DOES NOT count as a stitch. First stitch is placed in the same stitch as joined when working in the round.
- Cameo Crochet Cardigan is made to be oversized and comfy. The K hook makes looser stitches. You will get some stretch and it will relax more after blocking or washing.
- Fit will also depend on yarn used. A less dense yarn (Hobby Lobby’s I Love This Yarn, which is in the photo above of Ivory Tweed) will stretch more. A more dense yarn (Red Heart With Love, the pink Cameo color in the photos on pg 2) will not stretch as much.
- Pattern is worked in vertical continuous rows of the front right panel, back panel, and left front panel. No finishing off on these rows. This pattern will be joining the shoulders to the front or back panels and the border to close as you work them.
- On the rows that join at the shoulders, border, or cuffs, turn the work left OVER right. This will keep your next stitch from being twisted. See photo (d) Also, re-adjust the tension on your hook after turning. If you find it hard to see where to place your next join, you could use stitch markers before turning.
- Check your gauge BEFORE starting the Cameo Cardigan. If you are getting more stitches/rows per 4” than the gauge, go up a hook size. If you are not getting enough stitches/rows, then go down a hook size.
- When joining on the sleeve rows, pull your slip stitches tight. This will make the joins less visible.
- To secure tails when changing skeins or colors, crochet over the tail then leave a few inches out. Go back and weave in the ends going the opposite direction. This will keep the tails from unraveling.
- If you find the seam traveling on the sleeves or pockets, turn at each row.
- Pattern is written with each size written in its own separate instructions. The Adult Sizes include instructions for pockets, but the Child Size Pockets can be added after.
- If you find it difficult to slip stitch and join the shoulders as you work, feel free to work the pattern without slip stitching. Just chain for the arm holes, turn and work across/back and forth. This will make a large rectangle and you can sew at the shoulders once finished.
See the full video tutorial on Crochet It Creations YouTube Channel HERE
Small Child Crochet Cardigan
Size 6/8 Measures approximately 20”L x 28” around with 12” sleeve
Front right panel
Row 1: Foundation SC 58 (58) turn
Row 2: Ch 2, DC across (58) turn
Row 3: Ch 1, SC across (58) turn
Row 4 – 12: Repeat rows 2 & 3 (58) *ending with DC row
Arm Hole Row – Row 13: SC in 40 stitches, ch 18 skip remaining stitches. Join to corner of ch-2 from row 12. (58, including chains)
You will now be working the back panel and slip stitching to the front panel to close the shoulder up as you work each row.
Back Panel
Sl St again in the ch-2 space from row 12. This will count as ch 2 for row 14. Turn.
Row 14: DC in 18 chains and across (58) turn
Row 15: Ch 1, SC across. (58) join to the side of the SC from row 13 of the front panel, pull Sl St tight. Sl St to the ch-2 of next row of front panel. Sl St again in the ch-2 space. This will count as ch 2. (3 Sl St total) Turn your work.


Row 16: DC across. (58) turn
Row 17 – 25: repeat rows 15 & 16
Join after row 25 to last row’s SC of the front panel (the foundation row) turn
Row 26: Ch 2, DC across. (58) turn
Row 27: Ch 1, SC across (58) turn
Row 28 – 42: repeat rows 26 & 27. Ending with DC row
Arm Hole Row – Row 43: SC in 40 stitches, ch 18, skip remaining stitches. Join to corner of ch-2 from row 42. (58, including chains)
You will now be working the other front panel and slip stitching to the back panel to close the shoulder up as you work each row.
Front Left Panel
Sl St again in the ch-2 space from row 42. This will count as ch 2 for row 44. Turn.
Row 45: DC in 18 chains and across (58) turn
Row 46: Ch 1, SC across. (58) join to the side of the SC from row 41 of the back panel, pull Sl St tight. Sl St to the ch-2 of next row of back panel. Sl St again in the ch-2 space. (3 Sl St total) This will count as ch 2. Turn your work.
Row 47: DC across (58) turn
Row 48 – 55: Repeat rows 46 & 47 ending with SC row and 1 Sl St to side of SC to join shoulder. There will be 5 rows at the neck that will be left “open”. Finish off
Neck/Front Border of Crochet Cardigan
Join to the inside corner of the right front panel. Band is made in horizontal rows and joined to the stitches of the front and back panels to continue the no sew of the pattern.
Chain 13
Row 1: HDC in each chain across (12) join to next st of row 55, pull Sl St tight. Sl St in next 2 stitches, counts as chain for beginning of next row (3 Sl St total) Turn


Row 2: HDC in BLO of 11 st, HDC in both loops of last st (12) turn
Row 3: Ch1, HDC in BLO across. (12) join to next st, pull tight. Sl St in next 2 stitches, counts as chain for beginning of next row. (3 Sl St total) Turn.
Repeat rows 2 & 3 up the front right panel, across the neck, and down the front left panel. Continue the same concept of joining the shoulder for attaching the border around the neck – Sl St 1 in SC rows and 2 in each ch-2 of DC rows.
Last row should end at the corner of front left panel. DO NOT FINISH OFF. Continue to bottom border. If for some reason yours ends on the inside of the border, finish off and attach to the corner of the front left panel.
Bottom Border
Ch 1 and turn to work across the bottom border.
Row 1: ch 1, SC across the front border, SC across bottom placing 2 SC at the end of DC rows, 1 SC at the end of SC rows. SC across the other front border. Finish off

Garment is now essentially reversible since every row has been back and forth. They look the same on either side. Choose the side of your liking before starting on the sleeves. You may notice that one side of the joins at the shoulders look “bumpy” from the slip stitches. I prefer to have those on the inside. Or you could keep it as a vest.
Sleeves
Join with slip stitch to bottom of sleeve hole.

Row 1: Ch 1, SC 36 times in arm hole,,join (36)
Row 2: Ch 2, DC2TOG, DC in remaining st around, join (35)
Row 3: Ch 1, SC2TOG, SC in the remaining st around, join (34)
Row 4 – 9: repeat rows 2 & 3 (ending with 28 st at row 9)
Row 10: Ch 2, DC around. (28)
Row 11 – 26: repeat rows 3 & 10. It will end on DC row with 20 stitches.
Row 27: Ch 1, SC around, join (20) Finish off. Weave in ends.
Optional to make a pocket of DC rows and sewn on the child crochet cardigan after.

- Find the Adult XS/S Women’s 0-6 Size here
- Find the Adult Medium/Large Women’s 8-12 Size here
- Find the Adult XL/2XL Women’s 14-20 Size here
- Purchase the Ad-Free, Printable PDF of the Adult and Child Crochet Cardigan sizes together from Ravelry here
- Find the Child Size Large 10/12 here
- Find the preschool size here
- Find the toddler size here
- Find the baby size here
Save for later or share with others using the share buttons at the top and bottom of post. If you have any questions please comment below or you can email me. I love to see photos of your work and read your comments. Follow Crochet It Creations on all of your favorite social media sites!
You may sell your items made from my patterns. Please do not use my photos as your own to sell your work. A link back to my site is much appreciated when selling your items from my patterns. I hope you enjoy!
This site is supported by advertisers and may contain affiliate links. See copyright & disclosure policy here for more information.


Hi
Thanks for the pattern
I did it but I have a small problem with the neck/front border of the cardigan
It is not like the photo
I’m making this for my grand daughter , but having a little trouble joining the shoulder. I end up with a couple rows left unstitched. What am I doing wrong?
You may have your row count off or not lining the rows up while joining. You can not join the shoulder seam as you work and sew together at the end if it is easiest 🙂