Prefer a PDF ad-free version to print? Find HERE from Ravelry or HERE from Etsy. Purchased pattern also includes photos of each row for more guidance.
Once upon a time, not very long ago I said I wasn’t a fan of triangle scarves. But at that time, I had never actually made one or never wore one. I liked the way they looked on other people but thought they wouldn’t look right on me.
One day, I was playing with yarn. (my favorite thing to do!) I came up with some pretty stitches and put them into a triangle. Well, from there developed this Triangle Scarf pattern. And guess what?? I LOVE IT! I not only love the way it turned out, I love the way it looks on!

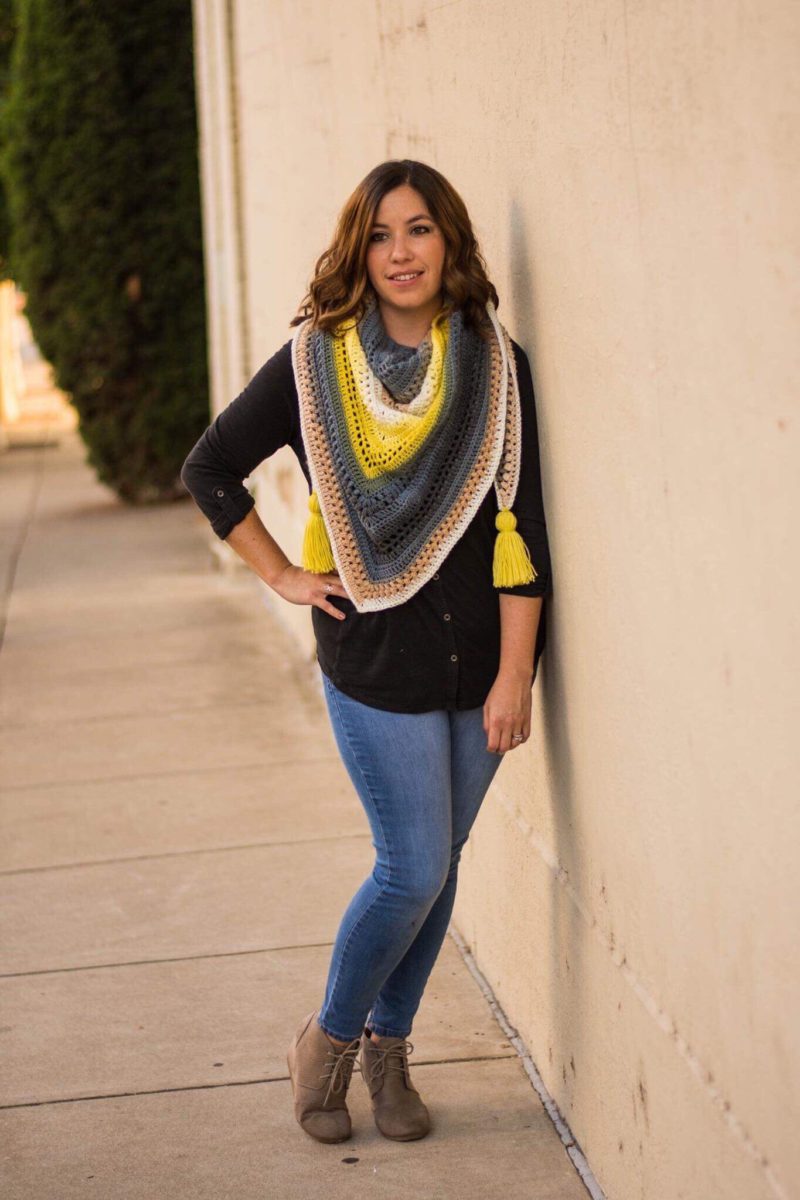
I live in Southern Indiana and our weather changes all the time. So, I wanted to make this pattern in a Light Weight yarn. Lion Brand Mandala is just perfect in it’s self striping yarn. They have a beautiful variety of colors. Any Light Weight yarn will work though.
The triangle scarf has beautiful stitches. It can be worn wrapped around as a scarf or as a shawl. The light yarn doesn’t feel too bulky or hot. Finished measurements are approximately 48″H x 64″W. Add 2-3 tassels to the corners to complete the look.
Triangle Scarf Crochet Pattern by Crochet it Creations
Materials Used
-
- Light weight # 3 yarn approximately 1100 yards or 2 Lion Brand Mandala cakes
-
- I 5.5mm Crochet Hook
-
- Scissors
- Tapestry Needle
Gauge
- 4” square = 15 DC x 7 rows
Stitches Used
-
- Puff Stitch – yarn over, insert hook into stitch. y/o, pull up a loop. y/o, insert hook in same stitch. y/o pull up a loop. y/o insert hook in same st. y/o pull up a loop. y/o pull through all 7 loops on hook
-
- DC – double crochet
-
- SC – single crochet
- Join – slip stitch to first stitch
Pattern Notes
-
- Pattern is written in U.S Crochet Terms
-
- Scarf is worked from the center out, in a triangle
-
- Beginning chain counts as a stitch (except the ch 1 for sc). Ex. ch 3 counts as a double crochet stitch, which is used often throughout the pattern
-
- Measures approximately 48” x 64” before blocking
-
- I HIGHLY recommend blocking after to relax stitches. See HERE about steam blocking.
-
- Style it by wearing as a wrap or a scarf
- See post HERE for how to make your own tassels
Row 1: in magic circle, ch 3 (counts as dc) dc 3 times. ch 1. dc 4 times. Pull ring tight. (8) turn
Row 2: ch 1. 2sc in same st. Sc in next 3 st. (sc, ch 2, sc) in ch-1 sp. sc in 3 st. 2sc in top of ch 3 (12) turn
Row 3: ch 3, dc in same st. dc in 5 st. (2dc, ch 1, 2dc) in ch-2 sp. dc in 5 st. 2dc in last st (18) turn
Row 4: ch 1. 2sc in same st. Sc in 8 st. (sc, ch 2, sc) in ch-1 sp. sc in 8 st. 2sc in top of ch 3 (22) turn
Row 5: ch 4 (counts as dc + ch 1), dc in same st. *ch 1, sk 1 st, dc in next* repeat again 4 times. Ch 1. (dc, ch 1, dc) in ch-2 sp. ch 1 dc in next st. *ch 1, sk 1 st, dc* repeat 4 more times. Ch 1, dc in same st. Turn
Row 6: ch 4 (counts as dc + ch 1). Dc in ch-1 sp. *ch 1 dc in next ch-1 sp* repeat 5 more times. Ch 1. (Dc, ch 1, dc) in ch-1 sp. *ch 1, dc in next ch-1 sp* repeat 6 more times. Ch 1. Dc in top of ch 3. Turn.
*Row 7: ch 3. Dc in same st. Dc in each ch-1 sp and dc across. (2dc, ch 1, 2dc) in ch-1 sp. dc in each ch-1 sp and dc across. 2dc in top of ch 3. (40) turn
Row 8: ch 1. 2sc in first st. sc across. (sc, ch 2, sc) in ch-1 sp. sc across. 2sc in top of ch 3 (44) turn
Row 9: ch 3, dc in same st. Dc across. (2dc, ch 1, 2dc) in ch-2 sp. dc across. 2 dc in last st. (50) turn
Row 10: repeat row 8 (54)
Row 11: ch 4 (counts as dc + ch1). puff stitch in same st. *ch 1. Sk 1 st. puff st.* repeat across. Last puff st in last sc. ch 1 (puff st, ch 1, puff st) in ch-1 sp. Ch 1, puff st in first st. *ch 1. sk 1 st. puff st* repeat across. Ch 1, puff st in last st. ch 1, dc in same st (30 puff st) Turn
Row 12: ch 4. puff st in firstch-1 sp. *Ch 1, puff st in next ch-1 sp* repeat across. Ch 1. (puff st, ch 1, puff st) in ch-1 sp. Ch 1, puff st in ch-1 sp. *Ch 1, puff st in next ch-1 sp* repeat across. Ch 1, dc in top of ch 3. (32 puff st) turn

Row 13: ch 3. dc in same st. Dc in top of ch 1 and each puff st across. (2dc, ch 1, 2dc) in ch-1 between 2 puff st at top of v. Dc in top of each puff st and ch 1 across. 2dc in last st. (72) turn
Row 14: ch 1. 2sc in same st. sc across. (sc, ch 2, sc) in ch-1 sp. sc across. 2sc in top of ch-3 (76) turn
Row 15: ch 3, dc in same st. dc across. (2 dc, ch 1, 2dc) in ch-2 sp. Dc across. 2dc in last st. (80) turn
Row 16: ch 1, 2sc in same st. sc across. (sc, ch 2, sc) in ch-1 sp. Sc across. 2sc in top of ch-3 (86) turn
Row 17: ch 4 (counts as dc + ch 1), dc in same st. *ch 1, sk 1 st, dc in next* repeat across to last st. Ch 1. (dc, ch 1, dc) in ch-2 sp. ch 1 dc in next st. *ch 1, sk 1 st, dc* repeat across. Ch 1, dc in same st. Turn
*Row 18: ch 4 (counts as dc + ch 1). Dc in ch-1 sp. *ch 1 dc in next ch-1 sp* repeat across to last st. Ch 1. (Dc, ch 1, dc) in ch-1 sp. *ch 1, dc in next ch-1 sp* repeat across. Ch 1. Dc in top of ch 3. Turn.
Repeat rows 7-18 THREE more times, or until reaches desired length
Repeat Rows 7 – 14. You will end with a sc row at 62 rows total. If you prefer to make wider/longer, continue on but finish with sc row.
At end of row 62, turn and work across the base of the triangle. Placing sc in the ends of each row across. Spacing them out evenly along the end of the rows. Join and finish off.


*Optional to make and add 2 or 3 tassels to the corners. See HERE how to make your own tassels. I also suggest to either steam or wet block your finished item. This relaxes the stitches and gives it more drape. See HERE about steam blocking.
Prefer a PDF ad-free version to print? Find HERE from Ravelry or HERE from Etsy. Purchased pattern also includes photos of each row for more guidance.

Save for later or share with others using the share buttons at the top and bottom of post. If you have any questions please comment below or you can email me at jessica@crochetitcreations.com.
I love to see photos of your work and read your comments. Follow Crochet It Creations on all of your favorite social media sites! Join my Crochet It Creations Crochet Friends Facebook group to further connect!
You may sell your items made from my patterns. Please do not use my photos as your own to sell your work. A link back to my site is much appreciated when selling your items from my patterns. I hope you enjoy!
This site is supported by advertisers and may contain affiliate links. See copyright & disclosure policy here for more information.


This is BEAUTIFUL – I can’t wait to try it! Where in Southern Indiana are you? I’m also here!
Thank you! – Evansville area
Me, too! Take care. <3
Wish there would be a youtube video. Find it hard this way 🙁
Hi Heili! My full time job and schedule makes it impossible to make a video on every pattern. I can add this one to my to do list though!