
Prefer a PDF version to print? Click Here —> 
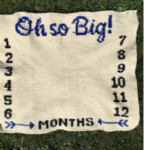
The Summertime Vest is a FREE Crochet Pattern by Crochet It Creations. It is a simple rectangle pattern that is made with basic crochet stitches. Use cotton yarn to give an extra light weight feel. This top comes in child sizes. See chart below.
I love working with the Moss Stitch, like my Drink Koozie Crochet Pattern. For this pattern I replaced the single crochets from the moss stitch with double crochets. The double crochets give this pattern a nice airy feel. This technique of dc, ch 1 repeats is also used in my Carry All Drawstring Crochet Pattern.
Use the size chart below to make your little one any size you need. Pattern could also easily be adjusted for adult sizes. Find the PDF printable version HERE on Ravelry.
Summertime Vest Crochet Pattern by Crochet it Creations
Materials Needed
- J 6.0mm for body and H 5.0mm for straps Crochet Hooks
- Cotton Yarn, or any medium # 4 yarn
- Scissors
- Finishing needle
- 4 Stitch Markers
Stitches Used
- DC – double crochet
- Ch – chain
- Sl St – slip stitch
Gauge
- 4” square = 16 st (as the pattern) x 6 rows
Pattern Notes
- Pattern is written in U.S. Crochet Terms
- Ch 2 at beg of row DOES NOT count as a stitch, although you will be working into it
- Body is made in vertical rows as one long rectangle, then straps added after.
- How to determine your size. Measure around your torso. Times that number by 1.5. That gives you the number of inches long the rectangle needs to be. Use gauge to determine how many rows needed.
- Chart below can be used to adjust size or use if unable to measure torso.
- Chain the amt of stitches in the chart + 2 for size you are making. Complete the amount of rows in the chart for that size.
- If you would like the vest to be longer, chain more at the beginning. You can use any even number + 3.
- Optional to add fringe to the front of the vest after completing
| Child Size | Yardage Used | Fits Bust Size | Rectangle Length in Inches | Rectangle Length in Rows | Rectangle Width in Stitches | Strap Stitch Length |
| 2 | 160 | 21” | 31.5” | 47 R | 45 S | 19 CH |
| 4 | 170 | 23” | 34.5” | 52 R | 47 S | 21CH |
| 6 | 180 | 25” | 37.5” | 56 R | 49 S | 23 CH |
| 8 | 200 | 26.5” | 40” | 60 R | 51 S | 25 CH |
| 10 | 240 | 28” | 42” | 63 R | 53 S | 27 CH |
| 12 | 280 | 30” | 45” | 67 R | 55 S | 29 CH |
| 14 | 320 | 31.5” | 47” | 70 R | 57 S | 31 CH |
| 16 | 360 | 32.5” | 49” | 73 R | 59 S | 33 CH |
Child Size 8 Example
See Pattern Notes or Chart for adjusting to other sizes
Ch 53 (ex. 51 stitches wide from the chart + 2 ch)
Row 1: dc in 3rd st from hook, *ch 1, sk 1 st, dc* repeat across working in the back bump of the chain. (51 of dc & ch-1)
Row 2: Ch 2, dc in 1st ch-1 sp, *ch 1, dc in next ch-1 sp* repeat across ending with ch 1 and dc in top of ch 2 from previous row (51 of dc & ch-1)
Rows 3-60: repeat row 2
Finish off, weave in ends
*Take 4 stitch markers and place where you would like to place the straps on the front & back of each side. The front is made for the panels to overlap.
 8
8

Straps
**see chart for how many chains to use for the size you are making**
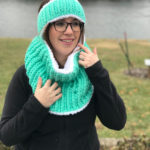
Attach yarn to top of the DC of the back stitch marker with a join. (See photo on next page, notice it’s not right next to the stitch marker. You will use the row before and after the stitch marker for the strap)

Row 1: Chain 25. Join to front stitch marker, but at the opposite end of the dc closest to the underarm. Sl St to the dc again, closest to the stitch marker. Turn

Row 2: working back up the chain. sl st across ch (25) join to top of dc from previous join, pull join tight. Sl st again into next rows dc. turn
Row 3-4: sl st across (25). join into the dc of the next row, pull sl st tight. Sl st into the top of the dc for that row. Finish off. Weave in ends. Repeat for other side.
Photo is the completed strap with joining it to the DC stitches.

Add fringe to the front….and that is it!! See a Scarf Pattern here for how to add fringe to a crochet item, video included.
Add closure to the front of the vest by taking a 12” piece of yarn and tieing the front together. Or attach a button. Or tie together pieces of the fringe in the front. Or leave open.
Now you have a simple, stylish rectangle child’s vest!

Save for later or share with others using the share buttons at the top and bottom of post. If you have any questions please comment below or you can email me at jessica@crochetitcreations.com.
I love to see photos of your work and read your comments. Follow Crochet It Creations on all of your favorite social media sites! Join my Crochet It Creations Crochet Friends Facebook group to further connect!
You may sell your items made from my patterns. Please do not use my photos as your own to sell your work. A link back to my site is much appreciated when selling your items from my patterns. I hope you enjoy!
This site is supported by advertisers and may contain affiliate links. See copyright & disclosure policy here for more information.

I just love all these things you make. Am doing one of your hats right now. Thank you. I’m thinking that patriotic girls vest is another I want to do for granddaughter and maybe grandson too for 4th of July parade.