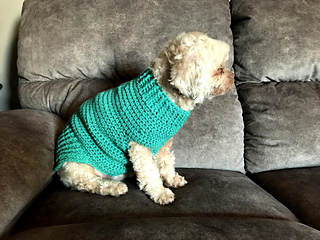
Winter is here and I’m not the only one freezing! My 14lb Shih-poo has been shivering since it dropped below 40 degrees. She is not a fan of the cold weather and those cheap dog sweaters from Walmart are not keeping her warm enough. I decided a handmade dog sweater by me would be MUCH warmer and more stylish of course!
The Doggy Sweater is constructed in round rows from bottom up and NO SEWING! YAY! I almost started the pattern with using back and forth rows sewing the underneath, but I’m definitely more of a fan of crocheting than sewing. So, I decided no sew was the best way to go! It uses simple HDC stitches and front post/back post HDC.
This is the size small Doggy Sweater crochet pattern. Recommended for dogs (or cats) 10-18 lbs. Finished product measures approximately 15”L x 18”W. Find more sizes below.
- For size XXS 2-5 lb see here
- For size XS 5-10 lb see here
- For size Medium 18-28 lb see here
- For size Large 28-40 lb see here
- For size XL 40-60 lbs see here
THIS PATTERN WAS UPDATED JANUARY 2020 HERE ON CROCHETITCREATIONS.COM
Let’s get started so we can keep those doggies warm!

Materials Needed
- I 5.5mm Crochet Hook, or size needed to obtain gauge
- Medium weight #4 acrylic yarn
- Scissors
- Tapestry Needle
- Optional: Stitch Markers
Gauge
- 4″ x 4″ square – 10 rows x 14 HDC
Stitches Used
- FHDC – Foundation Half Double Crochet
- HDC – Half Double Crochet
- SC – Single Crochet
- Sl St – Slip Stitch
- Ch – Chain
- FPHDC – Front Post Half Double Crochet
- BPHDC – Back Post Half Double Crochet
- HDC2TOG – Half Double Crochet 2 Stitches Together
- Join – Slip Stitch to First Stitch
- St(s) – Stitch(es)
Pattern Notes
- Be sure to check gauge before starting, different yarn or tension can alter the sizing.
- Beginning chain DOES NOT count as a stitch.
- Pattern is worked from the bottom up to the neck.
- Optional to place a stitch marker on the last st of each round instead of joining for the body of the sweater.
- Measure around your pet’s chest to check the fit or which size to make. Give 1-2” for stretching. My dog is wearing the small and was 19” around.

Size Small Dog Sweater Crochet Pattern
Row 1: FHDC 40, turn. (40)
Row 2-10: Ch 1, HDC in first st, *FPHDC in next st, BPHDC in next st;* repeat from * to * across until last st, HDC in last st, turn (40)
LOOSELY ch 24, be sure to not twist chain, Sl St to first st to form a circle.
Rnd 11-23: Ch 1, HDC in each st and ch around, join. (64) Finish off last rnd, unless ends in the center of the underside of the sweater.
Constructing the leg holes – Find the center of the underside of the sweater and join with a Sl St. (See photo 1)
Rnd 24: Ch 1, HDC in 4 sts, ch 11, sk 11 sts, HDC in 34 sts, ch 11, sk 11 sts, HDC in last 4 sts, join. (64)
Rnd 25-26: Ch 1, HDC in each st and ch around, join. (64)
Rnd 27: Ch 1, *HDC in 6 sts, HDC2TOG;* repeat from * to * around, join. (56)
Rnd 28: Ch 1, HDC around, join. (56)
Rnd 29: Ch 1, *HDC in 12 sts, HDC2TOG;* repeat from * to around, join. (52)
Rnd 30-32: Ch 1, HDC around, join. (52)
Rnd 33-37: Ch 1, *FPHDC in 1 st, BPHDC in next s;t* repeat from * to * around, join. (52) Finish off.
Add a border to the bottom & leg holes
Sl St to the bottom right corner, ch 1, SC across the last row of post sts, SC down the side of the HDC rows (place 1 SC in the end of each row), SC across the chain row, SC back up the other side of the HDC rows, finish off.
Sl St to the corner of the leg hole, SC around, join. Repeat on the other side. Weave in ends.
Photo 1: Center of the underside of small dog sweater
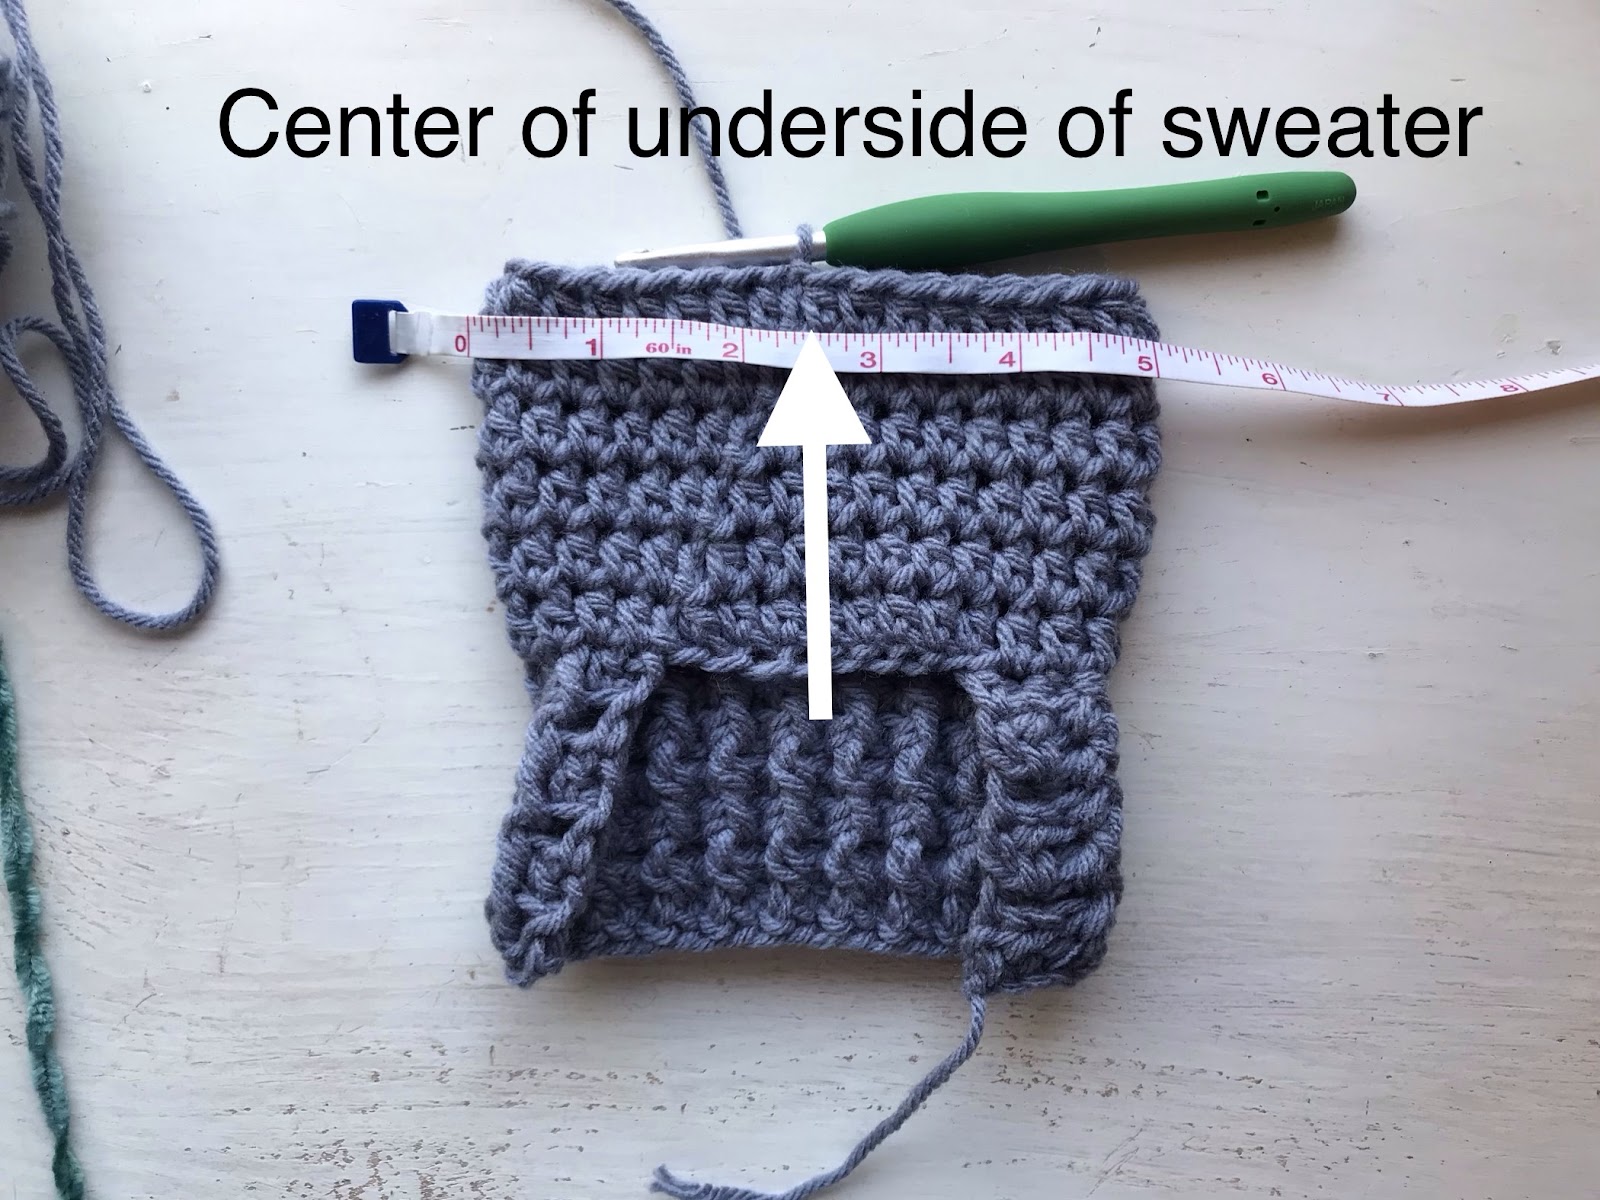
Photo 2: Before adding leg holes
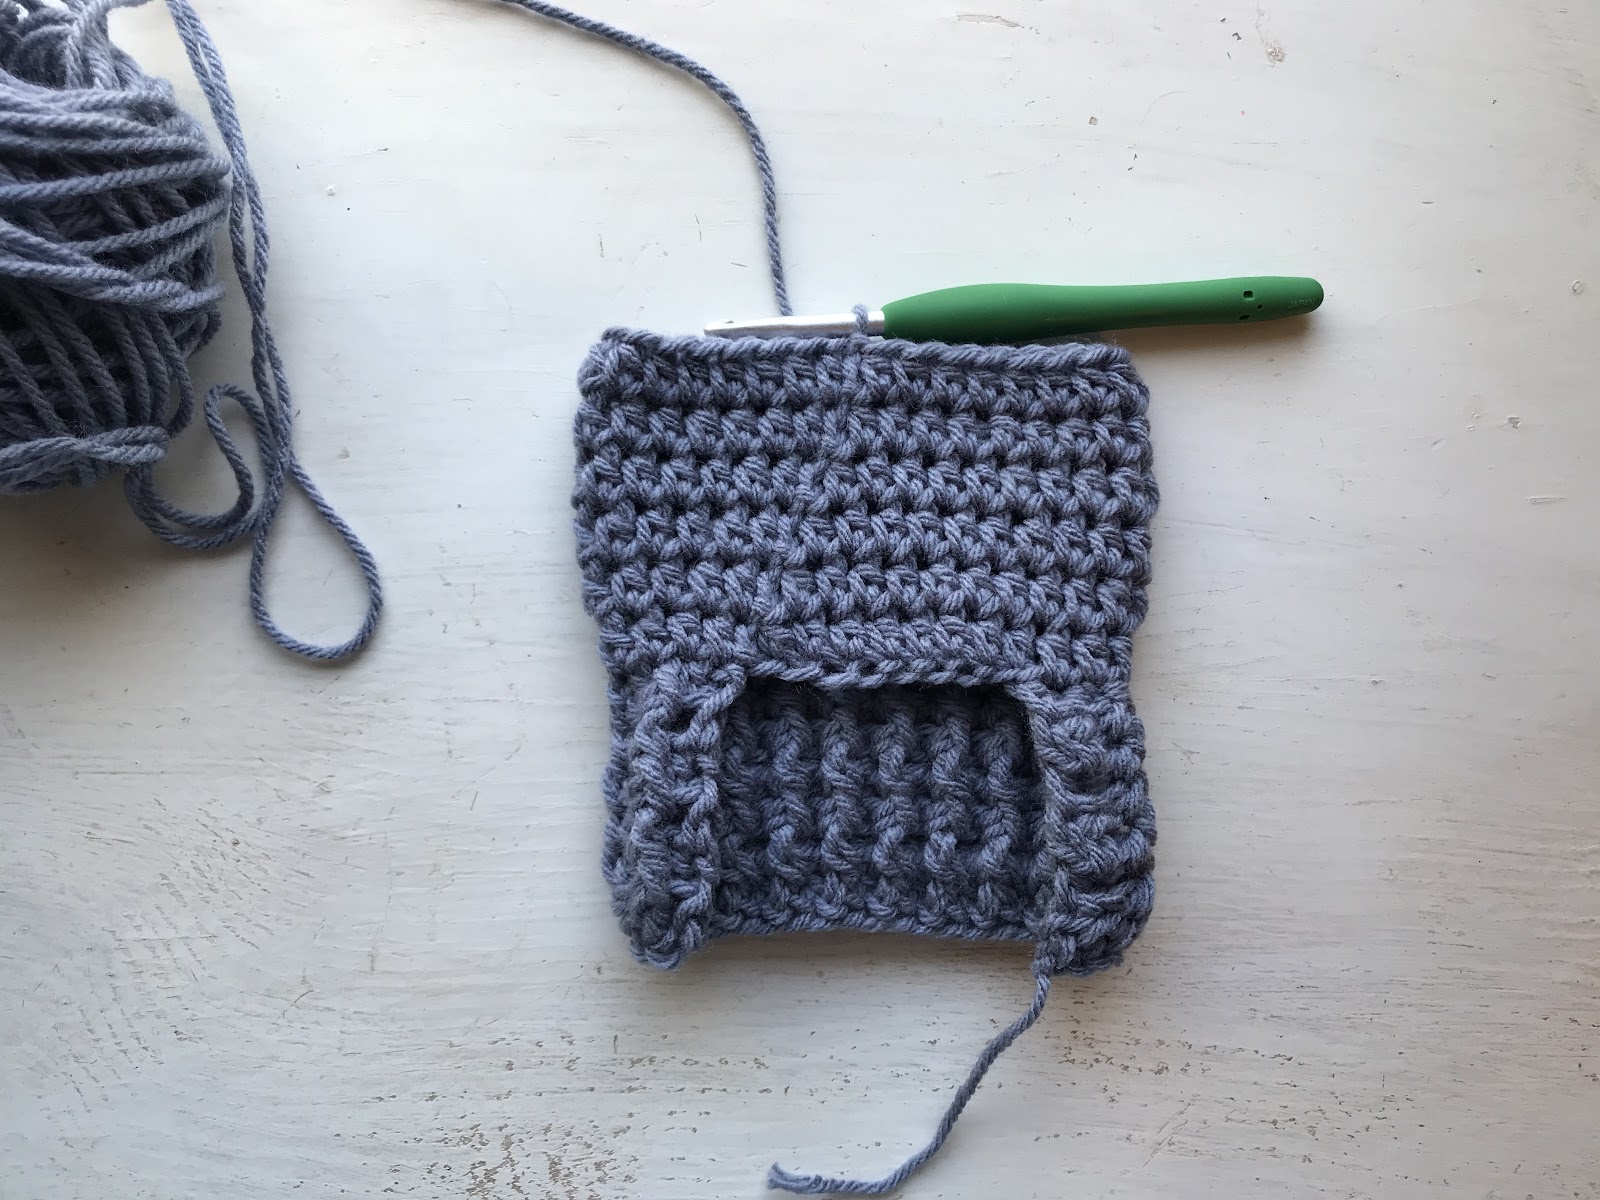
Photo 3: Leg Hole Row

Photo 4: Row After Leg Holes

Photo 5: Join to bottom right corner for border
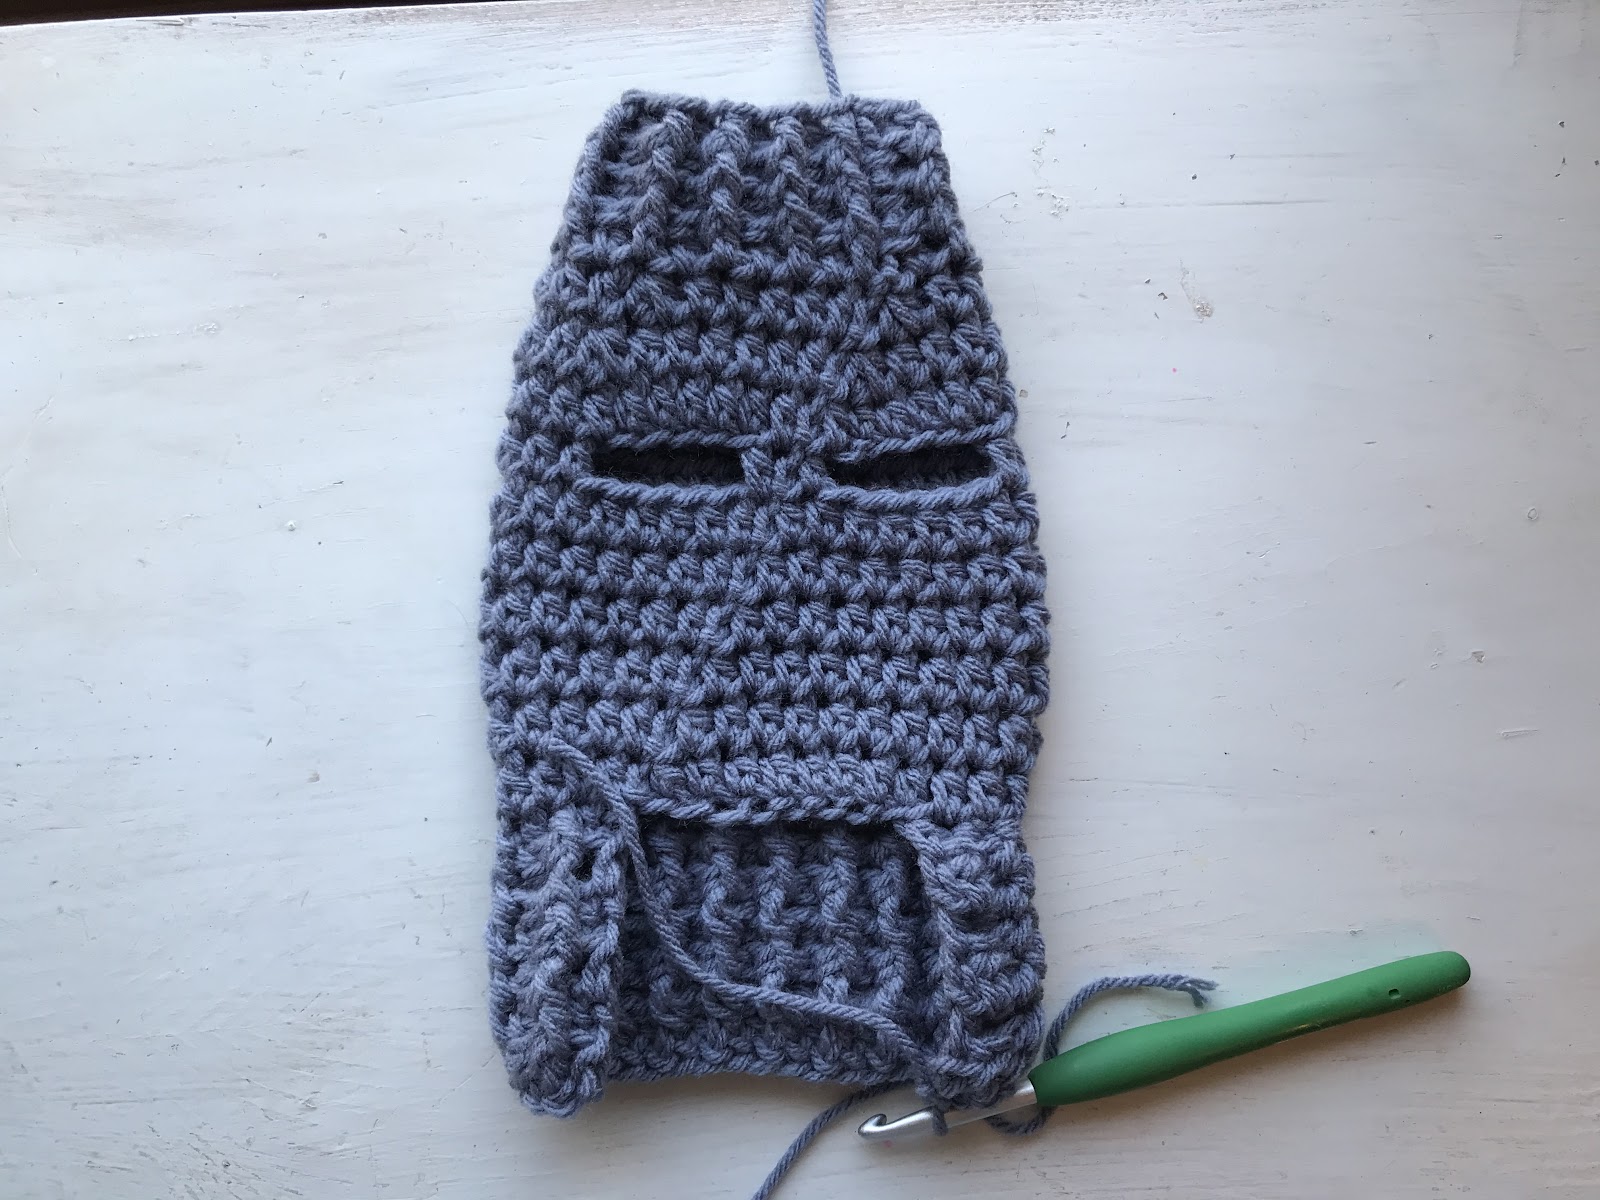
Photo 6: Finished top of sweater

THIS PATTERN WAS UPDATED JANUARY 2020 HERE ON CROCHETITCREATIONS.COM

Purchase the ad-free, printable version here for a small fee from Ravelry
Save for later or share with others using the share buttons at the top and bottom of post. If you have any questions please comment below or you can email me. If you do not crochet but would like to order, I take custom orders off of my facebook page. Follow Crochet It Creations on all of your favorite social media sites.
You may sell your items made from my patterns. Please do not use my photos as your own to sell your work. A link back to my site is much appreciated when selling your items from my patterns. I hope you enjoy!
This site is supported by advertisers and may contain affiliate links. See copyright & disclosure policy here for more information.

How would i measure my dog to figure out what size sweater to make? Thank you.
Hello! You can measure around the chest and from neck to bottom. I have included the measurements of the sweater on each page.
I assume that on the bottom and top ribbing that you are alternating the fphdc and bphdc rows? Isn’t specified in the pattern. Adorable sweater, just started one tonight.
Good catch. You’re not actually alternating rows. Your doing fp then bp. When you turn it will be reversed bp then fp to get them to line up. I will correct that. Thanks!
Thank you, actually what I meant just couldn’t figure out how to describe it LOL Thank you so much
I love this pattern!!! I made one yesterday and am making another today! I’ve been searching for a pattern that is done all in one piece and this is perfect!! Thank you soooooo much.
You are so welcome!! Glad you like it!!
[…] 16. Simple Crochet Pattern for Big Dog Sweater […]
Help! What am I doing wrong! At the point of making the leg openings and it seems like one would be in the front and the other in the back?
Hi peg! I responded to you email did that help?
I’m having the same leg opening problem!
Unfortunately some Crochet their hdc stitches differently. On the leg hole row, adjust so that the leg holes are
centered on the back
I didn’t, thank you! The pattern was great minus my confusion, thank you for it!
You are welcome!!
I love this pattern because there are no seams to sew and it works up so fast. I lost count of how many I have made for my dogs and the dogs I foster for a rescue group. Thank you.
So great to hear!!
Hi! Just checking if the gauge is intended to be measured with single crochet or hdcs. Love your pattern!
Hello! Gauge is for half double crochet stitches. I will update that in the pattern
I wasn’t sure if you are supposed to start hdc in the same stitch as joining stitch for each row of body or not. Since you mentioned that the stitches will start moving to the right at the joining point it helped me figure that out. Maybe if you state that in the pattern it would be more clear. I did it wrong by starting in the stitch next to join and it was wrong because it started to get narrow after each row. Lol. I think I got it right now. Love this sweater! My doggy thanks you too! Annette from Indiana.
Oh yes you hdc in the first stitch that you join to. The first stitch starts to move to the right just due to the nature of hdc stitches. They don’t perfectly line up on top of one another. Glad you got it worked out!
Hi Jessica! I absolutely love this pattern! My chihuahua looks adorable in her sweater! I would love to sell finished sweaters on Etsy, linking back to your site, of course. I would like to buy the printable version but each time I click the link, it sends me to Ravelry. Ravelry then sends me back to your website. Can you help me out, please?
Hi Krista! I’m actually in the process of updating this pattern that’s why the pdf is not available. Hoping to get that completed soon!
I’m sure it will be amazing! Thank you so much for getting back to me!
[…] 16. Simple Crochet Pattern for Big Dog Sweater […]
Hi I would love to see this with an option to add a hood 😎
Finished row 10, chained 14, but where do I attach it. If I do 1st idc, row 10, it becomes a circle. I can’t figure it out. Is there a video, or can you explain what I did wrong?
hello, it is supposed to become a circle. This pattern is in the process of being updated.
Is there a way to print this pattern? I click on the link, goes to Ravelry, click to download, takes you back to your page. On your page it does not allow me to copy the information so I can paste it into a document or Notes to print. There’s no option for a pdf that works. Please advise – I would love to print this in several sizes. Looks like a great pattern. I make sweaters for a rescue group where we got our 2 dogs and it will be perfect given the size options. Thanks!
Hello! It is in the process of being updated and should be finished with testing and edits in Jan 2020. Thanks!
How many chains do you start with? All it says is hdc
It uses a foundation half double crochet. See the stitches used section of the pattern for a link. A foundation row creates the stitch and the chain together. It has more stretch. If you prefer to chain you can chain 41, HDC in 2nd ch from hook.
Okay, thank you!
[…] Source by alindamulder65 […]
This is such a fantastic pattern. Thank you so much. I remember the previous pattern you provided had instructions for “sleeves”. Is it possible to include instructions for this?
You certainly can make sleeves. I omitted those. Just DC around for 1 row. FP/BPDC for the second row 😊
Aha! That’s one I was looking for FPDC. Thanks.
Have you used this pattern to make a sweater for a Dachshund? If so, did you make any adjustments? My little girl is 15 inches long and has is 15 inches around at her chest.
I have not but you could add extra rows for the length before the leg holes
After doing the fpdc and bpdc for the very bottom, where you say to loosely chain 24 then slip stitch to the first stitch to form a circle, are you saying the first of the 24 chain or somewhere else? Is it going to be doubled over itself? I’m just starting to learn how to read patterns and this part has me super confused. I have the urge to just loosely chain to the other side of the butt flap to have them joined to start working on the tummy area instead of this random circle dangling here.
Yes, you attach to the other side of the flap to start creating a circle.
i wish you had a youtube video to follow………I’m a new crocheter and I don’t know the stitch abrevs. I’m also such a visual learner LOL
Hopefully I can add that soon!
[…] original free pattern on crochetitcreations.com, or read more about […]